basic custom paint
+3
tezza43
Paul
tjjr07
7 posters
Page 1 of 1

basic custom paint
![]() by tjjr07 Mon 30 Jun 2008, 7:48 pm
by tjjr07 Mon 30 Jun 2008, 7:48 pm
first of all, thanks to those of you who gave suggestions on how to strip paint on models, it worked a treat.
so i thought id give something back!!!
this was all done in about 10 hours today using auto acrylic paints and an airbrush...
primed body shell ready for wet sanding using 1200 grit wet and dry...

base colour applied

3/4 tape and 2'' tape are great for free hand designs...

an old glass breadboard is great for cutting your mask, and also mirroring your design. cut your first pattern then turn glass over and hold into light, revealing your patterns opposite direction...

be sure to mask propperly if using an airbrush, overspray will get into every gap TRUST ME LOL

white paint aplied, i proceed to mask some more...

fine line tape is great for 1.1 but not so for scale, so i applied my paint directly from above to limit bleeding through. remember with an airbrush, light coats will help achieve colour desired with minimal build up along the edge of the tape

tape removed, not a great deal of bleed through and its dry ready for a quik sanding with scotchbrite
i was attempting some flames here but found them awkward to handle after removing them from the glass ( i will definetly try them again soon ) but it gives you a hint of where im coming from here lol

i ended up with a striped pattern instead, and its all masked up for some more paint

i also made a small template with clear A4 sheet, a great product for making your own templates


its all done, now all thats left is a final sand ( 3200 grit to feather the edges ) and plenty of clear so all edges can be polished out smooth...
hope someone finds this of some use!!!
so i thought id give something back!!!
this was all done in about 10 hours today using auto acrylic paints and an airbrush...
primed body shell ready for wet sanding using 1200 grit wet and dry...
base colour applied
3/4 tape and 2'' tape are great for free hand designs...
an old glass breadboard is great for cutting your mask, and also mirroring your design. cut your first pattern then turn glass over and hold into light, revealing your patterns opposite direction...
be sure to mask propperly if using an airbrush, overspray will get into every gap TRUST ME LOL
white paint aplied, i proceed to mask some more...
fine line tape is great for 1.1 but not so for scale, so i applied my paint directly from above to limit bleeding through. remember with an airbrush, light coats will help achieve colour desired with minimal build up along the edge of the tape
tape removed, not a great deal of bleed through and its dry ready for a quik sanding with scotchbrite
i was attempting some flames here but found them awkward to handle after removing them from the glass ( i will definetly try them again soon ) but it gives you a hint of where im coming from here lol
i ended up with a striped pattern instead, and its all masked up for some more paint
i also made a small template with clear A4 sheet, a great product for making your own templates
its all done, now all thats left is a final sand ( 3200 grit to feather the edges ) and plenty of clear so all edges can be polished out smooth...
hope someone finds this of some use!!!

tjjr07- I Love this place

-
 Number of posts : 796
Age : 41
Location : lockeyer valley qld
Registration date : 2008-03-21
Re: basic custom paint
![]() by Paul Mon 30 Jun 2008, 8:40 pm
by Paul Mon 30 Jun 2008, 8:40 pm
Sweet yankie scheme man! you are fast becoming a gun with that airbrush!!

Paul- AMCC ADDICT

- Number of posts : 4564
Age : 49
Location : Melbourne
Registration date : 2008-03-19
Re: basic custom paint
![]() by tezza43 Mon 30 Jun 2008, 11:30 pm
by tezza43 Mon 30 Jun 2008, 11:30 pm
Well described tj - thanks for your photos. That's a ripper of a colour scheme too.

tezza43- AMCC ADDICT
- Number of posts : 4318
Age : 80
Location : Mornington, Victoria
Registration date : 2008-03-21

Bryce- Moderator
- Number of posts : 3329
Location : Melbourne
Registration date : 2008-05-10
Re: basic custom paint
![]() by stevegt738 Tue 01 Jul 2008, 3:16 am
by stevegt738 Tue 01 Jul 2008, 3:16 am
Nice paint tutorial tj. That is going to be one nasty Stang  .
.

stevegt738- Legend Poster
- Number of posts : 1023
Age : 60
Location : Garfield, Vic.
Registration date : 2008-03-21
Re: basic custom paint
![]() by Andy Tue 01 Jul 2008, 3:36 pm
by Andy Tue 01 Jul 2008, 3:36 pm
Awesome stuff TJ. I will definately have to give something like this a go one day..
cheers
cheers

Andy- I Love this place
- Number of posts : 853
Age : 46
Location : Melbourne
Registration date : 2008-03-21 -

Re: basic custom paint
![]() by tjjr07 Fri 04 Jul 2008, 9:13 pm
by tjjr07 Fri 04 Jul 2008, 9:13 pm
thanks guys!!! the stang has been hit with clear and polished up and WOW its smooth. il post pics up when its done...
tjjr07- I Love this place
- Number of posts : 796
Age : 41
Location : lockeyer valley qld
Registration date : 2008-03-21
Re: basic custom paint
![]() by tjjr07 Tue 08 Jul 2008, 8:49 pm
by tjjr07 Tue 08 Jul 2008, 8:49 pm
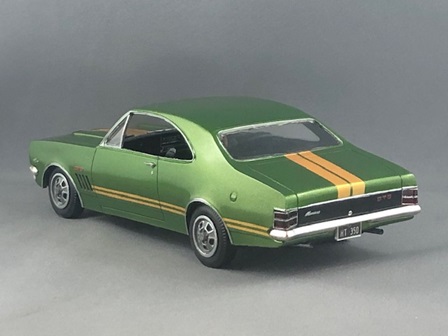
heres the finished product...


i also used 5% window tint to replace the side and rear glass...
i also used 5% window tint to replace the side and rear glass...
tjjr07- I Love this place
- Number of posts : 796
Age : 41
Location : lockeyer valley qld
Registration date : 2008-03-21
Re: basic custom paint
![]() by Paul Tue 08 Jul 2008, 9:11 pm
by Paul Tue 08 Jul 2008, 9:11 pm
Wow  !! nice paint Todd, that's a tough looking pony. Also thanks for the tip, I never thought about using tint for windows! how thick is it? & I hope your making plans to bring this and some of your others to Autochamps in September!!
!! nice paint Todd, that's a tough looking pony. Also thanks for the tip, I never thought about using tint for windows! how thick is it? & I hope your making plans to bring this and some of your others to Autochamps in September!!
Paul- AMCC ADDICT
- Number of posts : 4564
Age : 49
Location : Melbourne
Registration date : 2008-03-19
Re: basic custom paint
![]() by Bryce Tue 08 Jul 2008, 11:12 pm
by Bryce Tue 08 Jul 2008, 11:12 pm
That looks awesome Todd. You definitely build the toughest model cars in Australia! 

What's this window tint to which you refer?
What's this window tint to which you refer?
Bryce- Moderator
- Number of posts : 3329
Location : Melbourne
Registration date : 2008-05-10
Basic Custom Paint
![]() by forbidden Wed 09 Jul 2008, 11:38 pm
by forbidden Wed 09 Jul 2008, 11:38 pm
The paint turned out realy sharp, very nice my hat is off to you.
John
John
forbidden- AMCC NEWBIE!

- Number of posts : 6
Registration date : 2008-05-29
Re: basic custom paint
![]() by stevegt738 Thu 10 Jul 2008, 2:58 am
by stevegt738 Thu 10 Jul 2008, 2:58 am

 .
.
stevegt738- Legend Poster
- Number of posts : 1023
Age : 60
Location : Garfield, Vic.
Registration date : 2008-03-21
Page 1 of 1
Permissions in this forum:
You cannot reply to topics in this forum|
|
|