"RUST 101"
+2
speedster
Paul
6 posters
Page 1 of 1

"RUST 101"
![]() by Paul Tue 25 Mar 2008, 9:01 pm
by Paul Tue 25 Mar 2008, 9:01 pm
"RUST 101 LESSON 1"
Here's How the Dictionary defines RUST
–noun 1. Also called iron rust. the red or orange coating that forms on the surface of iron when exposed to air and moisture, consisting chiefly of ferric hydroxide and ferric oxide formed by oxidation.
2. any film or coating on metal caused by oxidation.
3. a stain resembling this coating.
4. any growth, habit, influence, or agency tending to injure, deteriorate, or impair the mind, character, abilities, usefulness, etc.
5. Plant Pathology. a. any of several diseases of plants, characterized by reddish, brownish, or black pustules on the leaves, stems, etc., caused by fungi of the order Uredinales.
b. Also called rust fungus. a fungus causing this disease.
c. any of several other diseases of unknown cause, characterized by reddish-brown spots or discolorations on the affected parts.
6. reddish yellow, reddish brown, or yellowish red.
–verb (used without object) 7. to become or grow rusty, as iron.
8. to contract rust.
9. to deteriorate or become impaired, as through inaction or disuse.
10. to become rust-colored.
–verb (used with object) 11. to affect with rust.
12. to impair as if with rust.
13. to make rust-colored.
–adjective 14. having the color rust.
—Verb phrases15. rust out, (of metal pipes, machinery, etc.) to decay and become unusable through the action of rust.
16. rust through, to develop holes, breaks, or the like, because of rust.
17. rust together, to join two metal pieces, as iron pipes, by causing the joint to rust.
rust [rast] noun
the reddish-brown substance which forms on iron and steel, caused by air and moisture
Example: The car was covered with rust. (sounds like they have seen Andy's Models )
)
Arabic: صَدأ
Chinese (Simplified): 铁锈
Chinese (Traditional): 鐵鏽
Czech: rez
Danish: rust
Dutch: roest
Estonian: rooste
Finnish: ruoste
French: rouille
German: der Rost
Greek: σκουριά
Hungarian: rozsda
Icelandic: ryð
Indonesian: karat
Italian: ruggine
Japanese: さび
Korean: 녹; 얼룩
Latvian: rūsa
Lithuanian: rūdys
Norwegian: rust; irr
Polish: rdza
Portuguese (Brazil): ferrugem
Portuguese (Portugal): ferrugem
Romanian: rugină
Russian: ржавчина
Slovak: hrdza
Slovenian: rja
Spanish: óxido
Swedish: rost
Turkish: pas
rust [rast] verb
to (cause to) become covered with rust
Example: The rain has rusted the gate; There's a lot of old metal rusting in the garden.
Arabic: يَصْدأ
Chinese (Simplified): 生锈
Chinese (Traditional): 生鏽
Czech: (z)rezivět, způsobit rezivění
Danish: ruste
Dutch: roesten
Estonian: roostetama
Finnish: ruostuttaa, ruostua
French: (se) rouiller
German: rosten(lassen)
Greek: σκουριάζω
Hungarian: (meg)rozsdásodik
Icelandic: ryðga
Indonesian: menjadikan berkarat
Italian: arrugginire, arrugginirsi
Japanese: さびる
Korean: 녹슬다; …을 녹슬게 하다
Latvian: rūsēt; saēst ar rūsu
Lithuanian: rūdyti, sukelti (ko) rūdijimą
Norwegian: ruste, anløpe
Polish: spowodować rdzewienie, rdzewieć
Portuguese (Brazil): enferrujar
Portuguese (Portugal): enferrujar
Romanian: a rugini; a oxida
Russian: ржаветь
Slovak: (z)hrdzavieť
Slovenian: (za)rjaveti
Spanish: oxidar
Swedish: rosta
Turkish: paslanmak
Why do do we need to know all this useless info you say! Well most of it is not very usefull to us but now Andy knows how to say Rust lots of Different ways
And I did say you might learn something in here!
Stage 1
Where do we get it? you ask.....................................................Ok a few years back while surfing my usual model car site(Hobby Heaven ) I came across a post by a guy who was building a Ratrod and the one thing that struck me with the build was the body was seriously rusty, but unlike any I had seen before this looked real (and it was'nt Rustall!). Us modellers are a helpful bunch and always keen to share our building secrets (!!!)so he posted up that it was real Iron paint from a craft store. now seeing as I don't live in the USA I had no idea where to find this kind of thing, so whenever I went past various places I thought might have it I stoped in to look but to no avail . Then on one of my many trips to Bunnings I ventured down the Craft Isle and there it was "Rust in a bottle"
  so I slapped my $35 on the counter and headed home with this miracle paint!
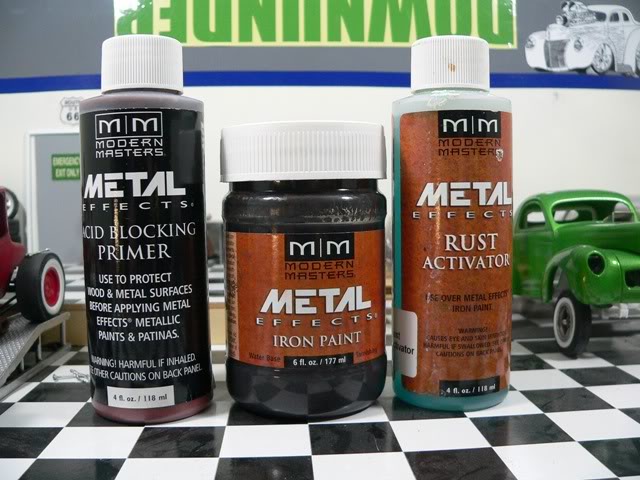
The 1st bottle is acid blocking primer it's not required but a great base to build from as it is a great rust colour and good for weathering on it's own (I recommend you get some as well)
the 2nd bottle is the Iron paint which contains real Iron Particles that will make your Rust (Keep the lid tight on this bottle as It will rust SHUT after a while) the bottle is Heavy so there's alot of metal in there.
The 3rd bottle is the Rust activator which speeds things up that would normally take a lot longer if left to Mother Nature (Be carefull with this it is a mild acid and will corrode more that the Iron paint If your not careful E.g it loves Aluminium)
Stay Tuned for "RUST 101" Lesson 2 soon
Here's How the Dictionary defines RUST
–noun 1. Also called iron rust. the red or orange coating that forms on the surface of iron when exposed to air and moisture, consisting chiefly of ferric hydroxide and ferric oxide formed by oxidation.
2. any film or coating on metal caused by oxidation.
3. a stain resembling this coating.
4. any growth, habit, influence, or agency tending to injure, deteriorate, or impair the mind, character, abilities, usefulness, etc.
5. Plant Pathology. a. any of several diseases of plants, characterized by reddish, brownish, or black pustules on the leaves, stems, etc., caused by fungi of the order Uredinales.
b. Also called rust fungus. a fungus causing this disease.
c. any of several other diseases of unknown cause, characterized by reddish-brown spots or discolorations on the affected parts.
6. reddish yellow, reddish brown, or yellowish red.
–verb (used without object) 7. to become or grow rusty, as iron.
8. to contract rust.
9. to deteriorate or become impaired, as through inaction or disuse.
10. to become rust-colored.
–verb (used with object) 11. to affect with rust.
12. to impair as if with rust.
13. to make rust-colored.
–adjective 14. having the color rust.
—Verb phrases15. rust out, (of metal pipes, machinery, etc.) to decay and become unusable through the action of rust.
16. rust through, to develop holes, breaks, or the like, because of rust.
17. rust together, to join two metal pieces, as iron pipes, by causing the joint to rust.
rust [rast] noun
the reddish-brown substance which forms on iron and steel, caused by air and moisture
Example: The car was covered with rust. (sounds like they have seen Andy's Models
Arabic: صَدأ
Chinese (Simplified): 铁锈
Chinese (Traditional): 鐵鏽
Czech: rez
Danish: rust
Dutch: roest
Estonian: rooste
Finnish: ruoste
French: rouille
German: der Rost
Greek: σκουριά
Hungarian: rozsda
Icelandic: ryð
Indonesian: karat
Italian: ruggine
Japanese: さび
Korean: 녹; 얼룩
Latvian: rūsa
Lithuanian: rūdys
Norwegian: rust; irr
Polish: rdza
Portuguese (Brazil): ferrugem
Portuguese (Portugal): ferrugem
Romanian: rugină
Russian: ржавчина
Slovak: hrdza
Slovenian: rja
Spanish: óxido
Swedish: rost
Turkish: pas
rust [rast] verb
to (cause to) become covered with rust
Example: The rain has rusted the gate; There's a lot of old metal rusting in the garden.
Arabic: يَصْدأ
Chinese (Simplified): 生锈
Chinese (Traditional): 生鏽
Czech: (z)rezivět, způsobit rezivění
Danish: ruste
Dutch: roesten
Estonian: roostetama
Finnish: ruostuttaa, ruostua
French: (se) rouiller
German: rosten(lassen)
Greek: σκουριάζω
Hungarian: (meg)rozsdásodik
Icelandic: ryðga
Indonesian: menjadikan berkarat
Italian: arrugginire, arrugginirsi
Japanese: さびる
Korean: 녹슬다; …을 녹슬게 하다
Latvian: rūsēt; saēst ar rūsu
Lithuanian: rūdyti, sukelti (ko) rūdijimą
Norwegian: ruste, anløpe
Polish: spowodować rdzewienie, rdzewieć
Portuguese (Brazil): enferrujar
Portuguese (Portugal): enferrujar
Romanian: a rugini; a oxida
Russian: ржаветь
Slovak: (z)hrdzavieť
Slovenian: (za)rjaveti
Spanish: oxidar
Swedish: rosta
Turkish: paslanmak
Why do do we need to know all this useless info you say! Well most of it is not very usefull to us but now Andy knows how to say Rust lots of Different ways
And I did say you might learn something in here!
Stage 1
Where do we get it? you ask.....................................................Ok a few years back while surfing my usual model car site(Hobby Heaven ) I came across a post by a guy who was building a Ratrod and the one thing that struck me with the build was the body was seriously rusty, but unlike any I had seen before this looked real (and it was'nt Rustall!). Us modellers are a helpful bunch and always keen to share our building secrets (!!!)so he posted up that it was real Iron paint from a craft store. now seeing as I don't live in the USA I had no idea where to find this kind of thing, so whenever I went past various places I thought might have it I stoped in to look but to no avail
. Then on one of my many trips to Bunnings I ventured down the Craft Isle and there it was "Rust in a bottle" The 1st bottle is acid blocking primer it's not required but a great base to build from as it is a great rust colour and good for weathering on it's own (I recommend you get some as well)
the 2nd bottle is the Iron paint which contains real Iron Particles that will make your Rust (Keep the lid tight on this bottle as It will rust SHUT after a while) the bottle is Heavy so there's alot of metal in there.
The 3rd bottle is the Rust activator which speeds things up that would normally take a lot longer if left to Mother Nature (Be carefull with this it is a mild acid and will corrode more that the Iron paint If your not careful E.g it loves Aluminium)
Stay Tuned for "RUST 101" Lesson 2 soon

Paul- AMCC ADDICT

-
 Number of posts : 4564
Age : 48
Location : Melbourne
Registration date : 2008-03-19
Re: "RUST 101"
![]() by speedster Tue 25 Mar 2008, 9:33 pm
by speedster Tue 25 Mar 2008, 9:33 pm
Wheres lesson two dont leave it like this i cant wait till next week make it soon youre killing me , andy quick whats lesson 2 tell me . 

speedster- I should be working on Models

- Number of posts : 224
Age : 61
Location : melbourne
Registration date : 2008-03-21
Lesson 2
![]() by Paul Tue 25 Mar 2008, 9:36 pm
by Paul Tue 25 Mar 2008, 9:36 pm
"RUST 101" Lesson 2
Now that you know where to get it here's lesson 2
"Research the subject"
Where you are right now is the best place to do your reseach "The Internet" It Does'nt matter if your building a Ratrod,Replica Or Junkyard dog the more info and knowledge of your subject the better it will look! Studying Rust in the real world is the best way to achieve a realistic finish. Here's some examples of what to look at,
worn paint on this chevy has caused the roof to rust along the tops from the paint getting years of abuse in the sun and weather,Notice how there is no gloss on the paint anywhere! mixing baby powder or coating it with a flat clear will give it that well weathered look in scale

Rust holes will appear where water and dirt have been sitting for long periods of time, look at the type of car your building and think about where it might rust.

Cars left in paddocks for decades will be extremly rusty like these poor ones!
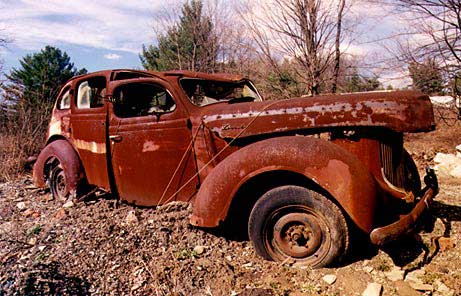
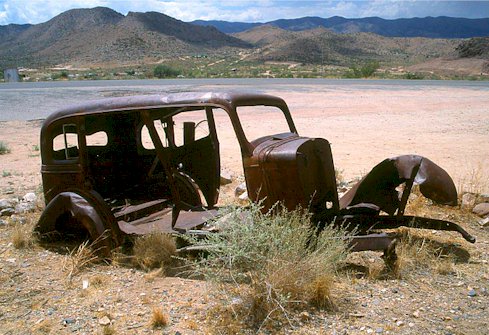
So jump online and see if you can find pics of weathered subjects in the 1:1 world, Knowledge is everything! and the more you know the better.
Lesson 3 "RUST 101" Coming soon
Now that you know where to get it here's lesson 2
"Research the subject"
Where you are right now is the best place to do your reseach "The Internet" It Does'nt matter if your building a Ratrod,Replica Or Junkyard dog the more info and knowledge of your subject the better it will look! Studying Rust in the real world is the best way to achieve a realistic finish. Here's some examples of what to look at,
worn paint on this chevy has caused the roof to rust along the tops from the paint getting years of abuse in the sun and weather,Notice how there is no gloss on the paint anywhere! mixing baby powder or coating it with a flat clear will give it that well weathered look in scale
Rust holes will appear where water and dirt have been sitting for long periods of time, look at the type of car your building and think about where it might rust.
Cars left in paddocks for decades will be extremly rusty like these poor ones!
So jump online and see if you can find pics of weathered subjects in the 1:1 world, Knowledge is everything! and the more you know the better.
Lesson 3 "RUST 101" Coming soon
Paul- AMCC ADDICT
- Number of posts : 4564
Age : 48
Location : Melbourne
Registration date : 2008-03-19
Lesoon 3 "RUST 101"
![]() by Paul Tue 25 Mar 2008, 10:11 pm
by Paul Tue 25 Mar 2008, 10:11 pm
"RUST 101" Lesson 3
Rust In Scale
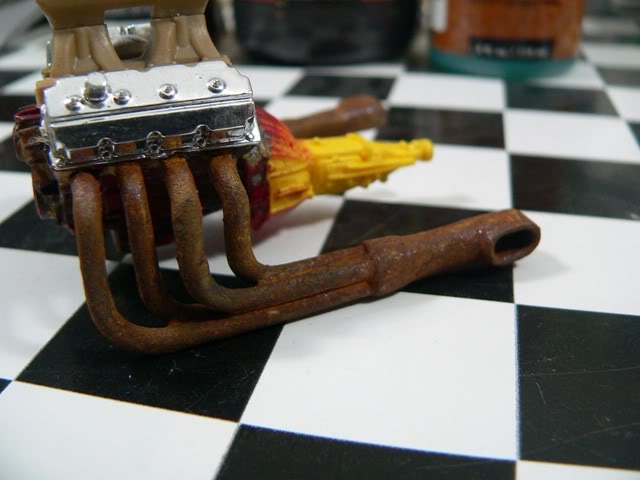
Rusting parts,cars and weathering in the 1/25th scale world will now be a whole lot easier Now that you've completed lessons 1 & 2 so here's a few tips and remember practice makes perfect!! and I'm sure you guys have no shortage of things to practice on, it could be as simple as an old part to put in the back of a pick up to a full exhaust system thats seen better days or you could jump in boots and all and rust the bejesus out of that old kit you know you may never build (I will leave the Diorama tips for Andy to post)!
These headers where assembled as per instructions (if there chrome it's best to strip them first via your favourite method)then painted by brush with the acid blocking primer (Brush will clean out with Water) and left to dry. Next using a cruddy old brush the iron paint was added all over and if you want a flakier area add it on thicker!!! Sit that aside to dry fully ( I never have much luck getting my brush clean and it usually ends up a rusty blob of bristles)
Once it's fully dry and your happy with the coverage grab another brush and add the rust activator (eye protection is highly recommended as you dont want Rusty eye's ) the activator is very waterery and flows on nicely getting into every crevice. After this process the real action begins and it starts to come alive getting rustier and rustier as it dries! If it's still not rusty enough for you by now give it a wet coat and leave it over night. By morning it should well and truly look like it's been left in the weather for years!!
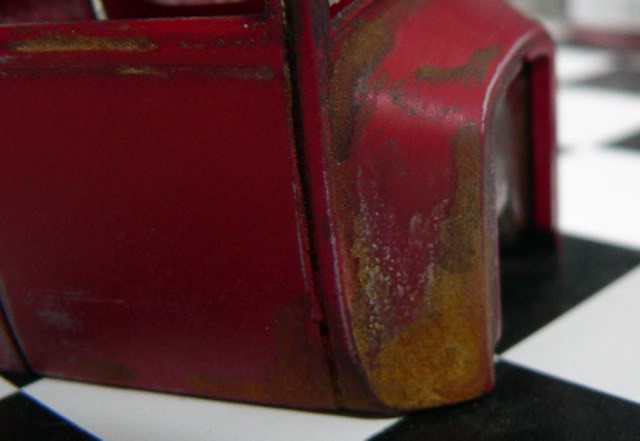
the rust stains from the bullet holes in the door as well as all the other weathering on SGT RATUS is done with this method and Various coloured washes (More on Washes in a later How to)

surface rust has never been easier! as seen here.
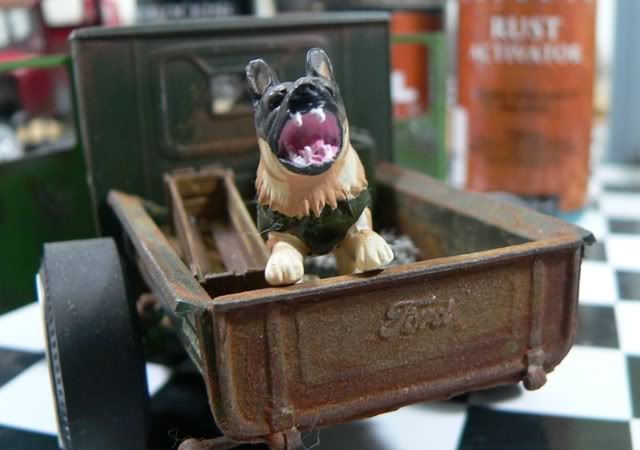
The tail gate has no paint it's just RUST! Beware the Bastard BITES!!
That completes My series on "RUST 101"
Feel free to ask questions and if were lucky ANDY might share his tips with us here also!
I Think Bunnings may be selling a lot of this stuff from now on!
Thanks Paul
Rust In Scale
Rusting parts,cars and weathering in the 1/25th scale world will now be a whole lot easier Now that you've completed lessons 1 & 2 so here's a few tips and remember practice makes perfect!! and I'm sure you guys have no shortage of things to practice on, it could be as simple as an old part to put in the back of a pick up to a full exhaust system thats seen better days or you could jump in boots and all and rust the bejesus out of that old kit you know you may never build (I will leave the Diorama tips for Andy to post)!
These headers where assembled as per instructions (if there chrome it's best to strip them first via your favourite method)then painted by brush with the acid blocking primer (Brush will clean out with Water) and left to dry. Next using a cruddy old brush the iron paint was added all over and if you want a flakier area add it on thicker!!! Sit that aside to dry fully ( I never have much luck getting my brush clean and it usually ends up a rusty blob of bristles)
Once it's fully dry and your happy with the coverage grab another brush and add the rust activator (eye protection is highly recommended as you dont want Rusty eye's
) the activator is very waterery and flows on nicely getting into every crevice. After this process the real action begins and it starts to come alive getting rustier and rustier as it dries! If it's still not rusty enough for you by now give it a wet coat and leave it over night. By morning it should well and truly look like it's been left in the weather for years!!the rust stains from the bullet holes in the door as well as all the other weathering on SGT RATUS is done with this method and Various coloured washes (More on Washes in a later How to)
surface rust has never been easier! as seen here.
The tail gate has no paint it's just RUST! Beware the Bastard BITES!!
That completes My series on "RUST 101"
Feel free to ask questions and if were lucky ANDY might share his tips with us here also!
I Think Bunnings may be selling a lot of this stuff from now on!
Thanks Paul
Paul- AMCC ADDICT
- Number of posts : 4564
Age : 48
Location : Melbourne
Registration date : 2008-03-19
Re: "RUST 101"
![]() by Carps Tue 25 Mar 2008, 10:33 pm
by Carps Tue 25 Mar 2008, 10:33 pm
I got mine from the art store in Upper Ferntree Gully and it was cheaper than Bunnings.
My tip FWIW.
I have a couple of containers of 'real rust' that I use to help things along.
Instead of using the base material like Paul I mix up some rusty coloured enamel and combine powedered rust with it. The podered rust is created by dropping a few new nails in a container with some water and leavingg for the water to evaporate and the nails to rust. My other rust came from beneath the BBQ hotplate in large flakes. Gust grind it up with a pestle or ball pien hammer head. I keep it in a sealed container and before using it, give the thing a thorough shaking, then leave it for the rust dust to settle.
Using this method and adding the rust paint and activator, I get varying shades of rust and also can manage the texture from rough to fine rust.
Of course I'm not quite so prolific or expert as Andy, but the result sar pleasin enough.
On the shed wall there's a mangled deuce fender that I mixed some rust dust with gloss enamel and painted it onto the part. Then I added the Iron paint and before it was all dried I applied the activator. The result is a partly rusty fender with spots of rust appearing through what was once the glossy factory paint job. Not unlike the roof of that Chevy pictured above, only different.

Carps- AMCC ADDICT
- Number of posts : 3168
Age : 34
Location : Could be anywhere.
Registration date : 2008-03-21
Re: "RUST 101"
![]() by Carps Thu 27 Mar 2008, 6:19 pm
by Carps Thu 27 Mar 2008, 6:19 pm
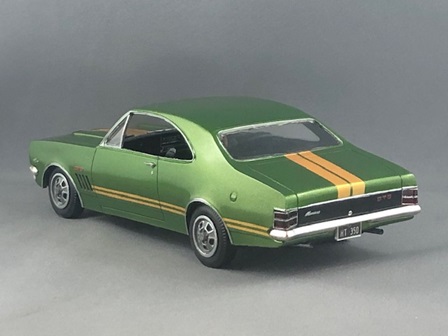
A while back some of us gave Andy a bit of freindly grief because he built a really cool and rusty relic with one minor 'issue'.
What was originally a fabric top has mysteriously rusted along with all the metal in his car. I think he has since rectified the problem.
Why I bring this up is because despite my regular inability (call it lack of patience) to do the perfect detail job, I'm a buit of a pain when it comes to said details. And the pic of the Chevy sedan above reminded me of something that we should not overlook when seeking to build the perfect rust bucket.
What is it?
If you look closely at the image you'll notice there seems to be a few places where the body has not rusted. Why? Because the body was assembled from various panels welded together. But welded seams go rusty before anything else, you say. Sure they do. However, these seams were usually filled with lead filler and smoothed over to provide a nice surface finish for the paint. And.... when the paint goes away and the metal rusts, the lead filled parts do not. They stay nice and smooth and sort of dull metallic grey in colour.
In more recent times, like post 60s, these welded seams would be filled with a broonze filler rod and smoothed over in similar fashion. Like lead filler, the bronze does not rust. Generally these seams on later model cars are at the top of the A and C pillars where the turret panel is joined to the car.
Of course if the car had ever been repaired it may have had plastic filler applied and again the effect in terms of where the rust is and isn't would be the same. If filled with lead the repair would be that grey metallic and if plastic filler was used a sort of yellowish white would be the colour. I think the rear door and quarter on the Mopar shown above may be indicative of this.
I guess my point here is even more rusty realism can ber added by understanding that different metals were used for different parts and they would therefore be corroded or aged differently rather than just rusted. For example, many early cars had brass or aluminium windscreen frames. Many engines used alloy components, for example the oil pans on early Ford Flatheads and four bangers were aluminium, so they would not rust like the cylinder block. Likewise inlet manifolds may not rust like exhaust manifolds because they may be made from anluminium rather than cast iron or steel.
Hope this helps with your next rusty detailing job.
Carps- AMCC ADDICT
- Number of posts : 3168
Age : 34
Location : Could be anywhere.
Registration date : 2008-03-21
Re: "RUST 101"
![]() by stevegt738 Thu 27 Mar 2008, 6:57 pm
by stevegt738 Thu 27 Mar 2008, 6:57 pm
Very good tutorial guys, lots of good info.especially about the different metals and fillers Carps.

stevegt738- Legend Poster
- Number of posts : 1023
Age : 60
Location : Garfield, Vic.
Registration date : 2008-03-21
Re: "RUST 101"
![]() by Paul Thu 27 Mar 2008, 8:46 pm
by Paul Thu 27 Mar 2008, 8:46 pm
Great Additional Information Carps!
Here's another tip: Chrome Trim on most cars are made from Stainless Steel and not Steel so they won't look rusty and would tend to be in rather good shape (be it dull and dinged)so if you want to add Bare metal foil to your rusty ride try using Aluminium BMF, or simply sand the trim off when doing your dings and rust holes and drill the clip holes where the Chrome trim would be if it was still attached to the car! All this will add that extra bit of realism.
Here's another tip: Chrome Trim on most cars are made from Stainless Steel and not Steel so they won't look rusty and would tend to be in rather good shape (be it dull and dinged)so if you want to add Bare metal foil to your rusty ride try using Aluminium BMF, or simply sand the trim off when doing your dings and rust holes and drill the clip holes where the Chrome trim would be if it was still attached to the car! All this will add that extra bit of realism.
Last edited by Paul on Sat 16 Oct 2010, 9:37 pm; edited 1 time in total
Paul- AMCC ADDICT
- Number of posts : 4564
Age : 48
Location : Melbourne
Registration date : 2008-03-19
Re: "RUST 101"
![]() by Paul Wed 01 Oct 2008, 8:50 pm
by Paul Wed 01 Oct 2008, 8:50 pm
Carps wrote:I got mine from the art store in Upper Ferntree Gully and it was cheaper than Bunnings.
Just a heads up for those still wanting to get into Rusting, Today whilst at Bunnings I went down the craft isle and noticed it was filled with house paint !!
 ..................I hope the craft stores still sell it!!!!
Paul- AMCC ADDICT
- Number of posts : 4564
Age : 48
Location : Melbourne
Registration date : 2008-03-19
Re: "RUST 101"
![]() by ROBBERY Thu 14 Oct 2010, 11:26 am
by ROBBERY Thu 14 Oct 2010, 11:26 am
Yeah g,day. I'm new here. But concerning the rust paint. I did allot of searching and found some at a Haymes paint store. It,s called Real Rust Paint, and a bottle of Oxidizing Patina, made by Haymes. Cost me $45.50 in total, but that,s for 250ml each bottle. (Should go a long way!) 
ROBBERY- AMCC NEWBIE!

- Number of posts : 13
Age : 62
Location : Adelaide
Registration date : 2010-10-07
Re: "RUST 101"
![]() by zenrat Thu 14 Oct 2010, 1:45 pm
by zenrat Thu 14 Oct 2010, 1:45 pm
I think you'll find that's HAYMES.
_________________
Fred
Badda Bing Badda Bang

zenrat- Moderator
- Number of posts : 6842
Age : 56
Location : Dank Northern slopes of Mount Martha, Vic
Registration date : 2008-07-17
Page 1 of 1
Permissions in this forum:
You cannot reply to topics in this forum|
|
|