Rusting with Andy
+2
tjjr07
Andy
6 posters
Page 1 of 1

Rusting with Andy
![]() by Andy Sat 29 Mar 2008, 9:41 pm
by Andy Sat 29 Mar 2008, 9:41 pm
Heyya people.. Heres how I do “barn find” rusters..
Just like the mustang and 49 mercury. As opposed to “paddock find” rusters… just like my early ford rustys.
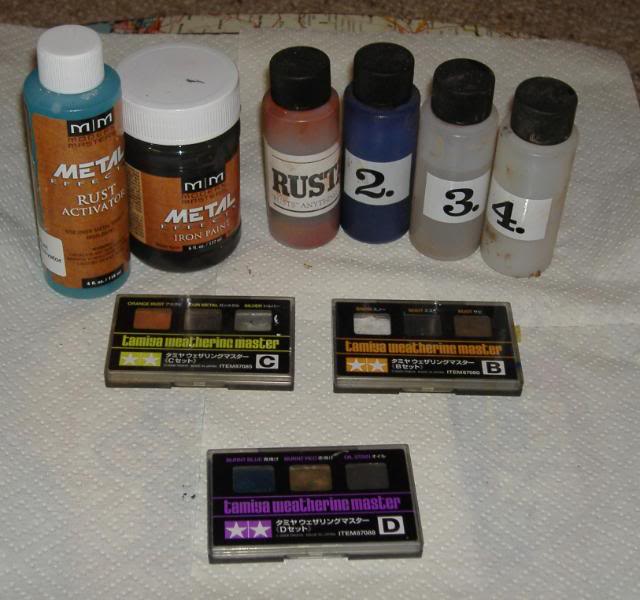
I use the same stuff as Paul and Carps, but with the addition of tamiya pastels and rustall.( i only use this coz I’ve got it) I use the pastels more than rustall. I also have a rust coloured paint I mixed up by accident. I use this for small things like to rust springs that pop through seats.
Either choose a model you built ages ago or grab a new kit and do a quick build on it… don’t worry about being clean, and don’t worry if the paint looks cruddy or has imperfections. It’ll all add to the look!
If you choose to use a new kit, slam that thing together.. get rid of seam lines but don’t worry about getting the plastic surface perfect…drill out the keyholes if you want…scrape off the badges (scripts)..don’t worry too much about getting the surface scratch free. Paint it up and give it a gloss.. doesn’t have to be good. No need to polish it! then get your flat clear and airbrush out…or you could just use a brush… apply to areas that would’ve been exposed to direct sunlight… ie, top of guards, bonnet, boot and roof…. Apply it unevenly and you will get glossy areas fading into dull, weather ridden looking paint. Again, don’t worry about being clean…..a bit of dust here and there, or a finger smudge is good. Let it all dry.
I use tamiya acrylics through an airbrush…it dries pretty quick…
For this demo Im using a 69 camaro . This kit was one of my first builds.. So its already painted, pretty amateur build. Definitely wasn’t a looker, but after this it’ll be a real head turner!!
I start off by ripping the car apart.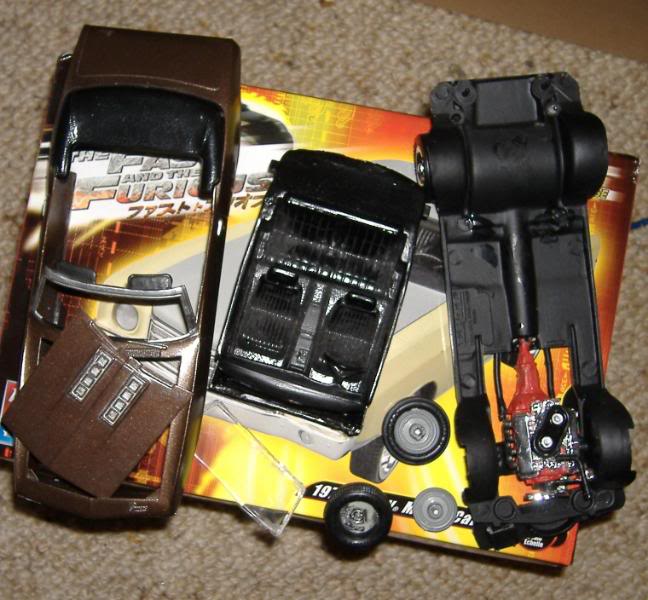
I scrape the badges off and drill a hole in the boot and the doors where the keyholes are.. Drill some holes where mirrors are meant to be and a small hole where the aerial would be…(if your subject car has one that is) I also cut one of the wipers off..

I’m now going to hit the body with flat clear.. doesn’t need much as this model was never clear coated.

If you want a dent or 2 just grab your trusty lighter.. I like to use a jet lighter…It heats up quicker….but you can do more unwanted damage with this type of lighter. From the inside of the body, heat the plastic up in the spot you want the dent. After a few seconds of heat, push the plastic from the outside of the body and hold it in until the plastic cools….(plastic is VERY HOT at this point…you may want to use something the size of your finger to push the hot plastic).

Now is the time for the messy work. Grab your “dentist drill” (dremel) and some small grinding bits. I used to use small drum sander bits, but they wear out extremely quick.
Heres a pic of the bits I use.. they cost between $15-$20 each. But well worth the money.

Start grinding all the inside of the body….Grind more in places where you want rust holes…don’t grind all the way through, unless you are after large rust holes.

Once this is done, grab your knife with a number 11 blade and push either from the inside or the outside where you want the little holes.. You can also use a pin for this..
Using your knife, make little cuts in the holes.. rough edges are what we are after.
Some of the edges can be carefully pushed in or pulled outward to achieve the desired rust eaten look.


Rough up some of the body with the edge of a file… just lightly… especially in places where dents are.
Now grab the Metal Effect Iron paint and and old small brush.. Splash the iron paint on, in and behind the holes you made… lightly brush it in places you want a little surface rust to come through. Give it a couple of coats, let dry between coats.

When its dry grab your rust activator and using a brush, wash the solution onto the iron painted bits. Give it another going over with the activator and set aside for an hour or so.
In this time, the activator will be rusting up the iron paint. Heres a pic 30 mins after applying the activator. I sit my model in my spray booth with the light on….helps on these cold Melbourne days.

Theres still more work to do on the body, but while that oxidizes we will move on to the next lesson.
PART 2 - Undercarrage
Im going to be using rustall and pastels on the underneath, firewall and radiator.
For those who aren’t familiar with rustall, it’s a 4 part rusting system. Bottle 1 is a rust solution.(rust coloured paint!) bottle 2 is a black wash, bottle 3 is just a watered down flat clear…..and bottle 4.. wow.a bottle of dirt from some dudes driveway from some foreign land…..
Just paint under the car flat black.. Then wash solution 1 of rustall over the surface with a thick brush. Let it almost dry and add some more of bottle 1 to add more rust. Once that has almost dried move onto bottle two, let almost dry… I skip bottle 3 here and move onto bottle 4. sprinkle the dirt over the surface… now go back to bottle 3 and wash it onto the surface, mainly over where the dirt is. When this dries it’ll make the dirt dry up nicely.
Before any weathering..
After using the 4 part Rustall system.

I use some the tamiya pastels now. Just lightly brushing it into different spots around the chassis.
After the pastels were applied.
That’s pretty much it for that part. We’ve still got the pastel work to do on the body, the interior and tyres need a good beatin! Then we’ll put it together adding some final touches and make a neat little diorama base for it.
Heres a before and after pic of the motor. I used a combo of rustall and paint..


Just like the mustang and 49 mercury. As opposed to “paddock find” rusters… just like my early ford rustys.
I use the same stuff as Paul and Carps, but with the addition of tamiya pastels and rustall.( i only use this coz I’ve got it) I use the pastels more than rustall. I also have a rust coloured paint I mixed up by accident. I use this for small things like to rust springs that pop through seats.
Either choose a model you built ages ago or grab a new kit and do a quick build on it… don’t worry about being clean, and don’t worry if the paint looks cruddy or has imperfections. It’ll all add to the look!
If you choose to use a new kit, slam that thing together.. get rid of seam lines but don’t worry about getting the plastic surface perfect…drill out the keyholes if you want…scrape off the badges (scripts)..don’t worry too much about getting the surface scratch free. Paint it up and give it a gloss.. doesn’t have to be good. No need to polish it! then get your flat clear and airbrush out…or you could just use a brush… apply to areas that would’ve been exposed to direct sunlight… ie, top of guards, bonnet, boot and roof…. Apply it unevenly and you will get glossy areas fading into dull, weather ridden looking paint. Again, don’t worry about being clean…..a bit of dust here and there, or a finger smudge is good. Let it all dry.
I use tamiya acrylics through an airbrush…it dries pretty quick…
For this demo Im using a 69 camaro . This kit was one of my first builds.. So its already painted, pretty amateur build. Definitely wasn’t a looker, but after this it’ll be a real head turner!!
I start off by ripping the car apart.
I scrape the badges off and drill a hole in the boot and the doors where the keyholes are.. Drill some holes where mirrors are meant to be and a small hole where the aerial would be…(if your subject car has one that is) I also cut one of the wipers off..
I’m now going to hit the body with flat clear.. doesn’t need much as this model was never clear coated.
If you want a dent or 2 just grab your trusty lighter.. I like to use a jet lighter…It heats up quicker….but you can do more unwanted damage with this type of lighter. From the inside of the body, heat the plastic up in the spot you want the dent. After a few seconds of heat, push the plastic from the outside of the body and hold it in until the plastic cools….(plastic is VERY HOT at this point…you may want to use something the size of your finger to push the hot plastic).
Now is the time for the messy work. Grab your “dentist drill” (dremel) and some small grinding bits. I used to use small drum sander bits, but they wear out extremely quick.
Heres a pic of the bits I use.. they cost between $15-$20 each. But well worth the money.
Start grinding all the inside of the body….Grind more in places where you want rust holes…don’t grind all the way through, unless you are after large rust holes.
Once this is done, grab your knife with a number 11 blade and push either from the inside or the outside where you want the little holes.. You can also use a pin for this..
Using your knife, make little cuts in the holes.. rough edges are what we are after.
Some of the edges can be carefully pushed in or pulled outward to achieve the desired rust eaten look.
Rough up some of the body with the edge of a file… just lightly… especially in places where dents are.
Now grab the Metal Effect Iron paint and and old small brush.. Splash the iron paint on, in and behind the holes you made… lightly brush it in places you want a little surface rust to come through. Give it a couple of coats, let dry between coats.
When its dry grab your rust activator and using a brush, wash the solution onto the iron painted bits. Give it another going over with the activator and set aside for an hour or so.
In this time, the activator will be rusting up the iron paint. Heres a pic 30 mins after applying the activator. I sit my model in my spray booth with the light on….helps on these cold Melbourne days.
Theres still more work to do on the body, but while that oxidizes we will move on to the next lesson.
PART 2 - Undercarrage
Im going to be using rustall and pastels on the underneath, firewall and radiator.
For those who aren’t familiar with rustall, it’s a 4 part rusting system. Bottle 1 is a rust solution.(rust coloured paint!) bottle 2 is a black wash, bottle 3 is just a watered down flat clear…..and bottle 4.. wow.a bottle of dirt from some dudes driveway from some foreign land…..
Just paint under the car flat black.. Then wash solution 1 of rustall over the surface with a thick brush. Let it almost dry and add some more of bottle 1 to add more rust. Once that has almost dried move onto bottle two, let almost dry… I skip bottle 3 here and move onto bottle 4. sprinkle the dirt over the surface… now go back to bottle 3 and wash it onto the surface, mainly over where the dirt is. When this dries it’ll make the dirt dry up nicely.
Before any weathering..
After using the 4 part Rustall system.
I use some the tamiya pastels now. Just lightly brushing it into different spots around the chassis.
After the pastels were applied.
That’s pretty much it for that part. We’ve still got the pastel work to do on the body, the interior and tyres need a good beatin! Then we’ll put it together adding some final touches and make a neat little diorama base for it.
Heres a before and after pic of the motor. I used a combo of rustall and paint..

Andy- I Love this place

-
 Number of posts : 853
Age : 46
Location : Melbourne
Registration date : 2008-03-21 -

Re: Rusting with Andy
![]() by tjjr07 Tue 01 Apr 2008, 2:24 pm
by tjjr07 Tue 01 Apr 2008, 2:24 pm
i would say you used the perfect car ( kit ) for this demo...
great demo, but i just cant bring myself to try it yet lol
great demo, but i just cant bring myself to try it yet lol

tjjr07- I Love this place
- Number of posts : 796
Age : 41
Location : lockeyer valley qld
Registration date : 2008-03-21
Re: Rusting with Andy
![]() by Carps Tue 01 Apr 2008, 4:37 pm
by Carps Tue 01 Apr 2008, 4:37 pm
Nice lesson Andy.
Never thought that Rustall kit would create such a good effect.
So when do we get the next lesson?
Never thought that Rustall kit would create such a good effect.
So when do we get the next lesson?

Carps- AMCC ADDICT

- Number of posts : 3168
Age : 34
Location : Could be anywhere.
Registration date : 2008-03-21
Re: Rusting with Andy
![]() by Andy Tue 01 Apr 2008, 6:41 pm
by Andy Tue 01 Apr 2008, 6:41 pm
Heres the next lesson people.......
Part 3 – Interior
The interior is pretty straight forward. To make rips in the floor covering etc, cover the floor and the top of the dash with tape and cut it into place nicely. Make some cuts in the tape and pull the cuts aside slightly.

The seats can be trashed by heating the underneath of them with a lighter and pushing down in the spot you want the “sag” in the seat. Just the same as making dents!
Make some holes for some springs to pop through. Do the same to the back seat and the front seats..

I used fabric black from a can.. I like the thickness of it.. It covers the lines in the tape well.. When dry, Hit the whole interior with flat clear… several coats in different places will result in a well weathered vinyl interior.

When its dry, I make some springs out of thin wire. Using a pin, wind the wire around the pin until you have a decent size. Now stretch out the spring slightly and cut little pieces off and glue them into the little holes made in the seats.

This is where I use my rust coloured paint. Brush all springs with this paint. Run a black wash over them when dry.
I decided to put some photoetched spanners instead of the steering wheel.. easy done! (these can be purchased through detaildownunder.com.au (photoetched interior junk).
Just a piece of styrene rod carved at the end to fit the spanners.


Now the windscreen, to make a broken, cracked windscreen. Using a small drill bit, make a hole halfway through the windscreen in the spot you would like the “impact” spot to be. From that hole, use your number 11 blade and make a spider web like pattern. Run some black wash through it. I used sharp scissors to cut the big chunk out. Glue windscreen in place.
Interior can be put back together now.

The tyres are simple.. I use my lighter and for a few seconds I heat up a small part of the tyre and rub my thumb over it to smooth out the tread.. Do this until the tyre is completely worn up. Run some rough sandpaper over the entire tyre.

The mag wheels, I use rustall and then over the top I use a bit of flat grey.. Different sorts of metals Carps and Paul talk about in their posts on rust, how metals rust different, or don’t rust at all.

Put the whole car together. This is where I do all my pastel work.. Using the orange rust colour and then the brown rust colour, I apply over entire body, using my fingers and the applicator to apply the pastels. I keep going until the desired effect is achieved.
Use some black wash on various parts to darken the rust pattern.
When the rusting is done, I glue a photoetched coat hanger into the aerial hole and paint it rust coloured.

We're nearly done..............
Part 3 – Interior
The interior is pretty straight forward. To make rips in the floor covering etc, cover the floor and the top of the dash with tape and cut it into place nicely. Make some cuts in the tape and pull the cuts aside slightly.
The seats can be trashed by heating the underneath of them with a lighter and pushing down in the spot you want the “sag” in the seat. Just the same as making dents!
Make some holes for some springs to pop through. Do the same to the back seat and the front seats..
I used fabric black from a can.. I like the thickness of it.. It covers the lines in the tape well.. When dry, Hit the whole interior with flat clear… several coats in different places will result in a well weathered vinyl interior.
When its dry, I make some springs out of thin wire. Using a pin, wind the wire around the pin until you have a decent size. Now stretch out the spring slightly and cut little pieces off and glue them into the little holes made in the seats.
This is where I use my rust coloured paint. Brush all springs with this paint. Run a black wash over them when dry.
I decided to put some photoetched spanners instead of the steering wheel.. easy done! (these can be purchased through detaildownunder.com.au (photoetched interior junk).
Just a piece of styrene rod carved at the end to fit the spanners.
Now the windscreen, to make a broken, cracked windscreen. Using a small drill bit, make a hole halfway through the windscreen in the spot you would like the “impact” spot to be. From that hole, use your number 11 blade and make a spider web like pattern. Run some black wash through it. I used sharp scissors to cut the big chunk out. Glue windscreen in place.
Interior can be put back together now.
The tyres are simple.. I use my lighter and for a few seconds I heat up a small part of the tyre and rub my thumb over it to smooth out the tread.. Do this until the tyre is completely worn up. Run some rough sandpaper over the entire tyre.
The mag wheels, I use rustall and then over the top I use a bit of flat grey.. Different sorts of metals Carps and Paul talk about in their posts on rust, how metals rust different, or don’t rust at all.
Put the whole car together. This is where I do all my pastel work.. Using the orange rust colour and then the brown rust colour, I apply over entire body, using my fingers and the applicator to apply the pastels. I keep going until the desired effect is achieved.
Use some black wash on various parts to darken the rust pattern.
When the rusting is done, I glue a photoetched coat hanger into the aerial hole and paint it rust coloured.
We're nearly done..............
Andy- I Love this place
- Number of posts : 853
Age : 46
Location : Melbourne
Registration date : 2008-03-21 -
Re: Rusting with Andy
![]() by Andy Tue 01 Apr 2008, 7:17 pm
by Andy Tue 01 Apr 2008, 7:17 pm
The final lesson
Part 4 - Little details and the diorama base…..
A loose bumper or guard? Easily fixed.. cut thin strips of black masking tape and stick it on those loose panels…. Gaffa tape will hold anything on 1-1 scale cars.

Lets make a tarp..
Cut some kitchen al-foil and place over the car. Cut desired size. Now press into place to get the shape and then paint both sides flat blue or whatever colour you want your tarp to be.
When dry either glue it into place or just place it back on the car loosely. Add a couple of trashed tyres to weigh down the tarp.

Now the diorama base.
Bunnings sell a variety of wood bases that are suitable for diorama’s. Or you could make your own.
First I use a spray bottle filled with diluted wood glue. I spray the entire base and sprinkle some sand over the whole thing.. an uneven, lively ground base for the grass.
I use the thin super glue and squirt it over the sand in a snake pattern. I then squirt the kick start accelerater over the super glue covered sand and it sets up straight away.

Squirt the base with the diluted wood glue and sprinkle your grass flocking over. Add as much or as little as you want. I then give it another spray with the diluted wood glue and set it aside to dry.. It will take a good handful of days to completely dry.
Add some detail to the area if you want. I chose to put some oil puddles in, I also decided on taking the passenger seat out and sat that into place on the base.. As the grass dries the seat should get become fixed.

Sit the car in place or glue it in. I just sit mine in and the grass usually fixes it as it dries.
Add as much or as little detail as you want.
I added a mechanic tinkering with the motor, a battery on the grass next to the front wheel, with the cables being chewed by a dog….. So this diorama will be called. “A Shocking Camaro”
Finished Diorama..


Im still learning, so if there are any tips or tricks you have for weathering, please add them..
Remember………if you stuff it.. RUST IT!
Part 4 - Little details and the diorama base…..
A loose bumper or guard? Easily fixed.. cut thin strips of black masking tape and stick it on those loose panels…. Gaffa tape will hold anything on 1-1 scale cars.
Lets make a tarp..
Cut some kitchen al-foil and place over the car. Cut desired size. Now press into place to get the shape and then paint both sides flat blue or whatever colour you want your tarp to be.
When dry either glue it into place or just place it back on the car loosely. Add a couple of trashed tyres to weigh down the tarp.
Now the diorama base.
Bunnings sell a variety of wood bases that are suitable for diorama’s. Or you could make your own.
First I use a spray bottle filled with diluted wood glue. I spray the entire base and sprinkle some sand over the whole thing.. an uneven, lively ground base for the grass.
I use the thin super glue and squirt it over the sand in a snake pattern. I then squirt the kick start accelerater over the super glue covered sand and it sets up straight away.
Squirt the base with the diluted wood glue and sprinkle your grass flocking over. Add as much or as little as you want. I then give it another spray with the diluted wood glue and set it aside to dry.. It will take a good handful of days to completely dry.
Add some detail to the area if you want. I chose to put some oil puddles in, I also decided on taking the passenger seat out and sat that into place on the base.. As the grass dries the seat should get become fixed.
Sit the car in place or glue it in. I just sit mine in and the grass usually fixes it as it dries.
Add as much or as little detail as you want.
I added a mechanic tinkering with the motor, a battery on the grass next to the front wheel, with the cables being chewed by a dog….. So this diorama will be called. “A Shocking Camaro”
Finished Diorama..
Im still learning, so if there are any tips or tricks you have for weathering, please add them..
Remember………if you stuff it.. RUST IT!
Andy- I Love this place
- Number of posts : 853
Age : 46
Location : Melbourne
Registration date : 2008-03-21 -
Re: Rusting with Andy
![]() by Guest Tue 01 Apr 2008, 10:14 pm
by Guest Tue 01 Apr 2008, 10:14 pm
First off luv the dog with the battery leads, This is one great tute on how to rust a car, I enjoyed reading and have learnt enough to give it a try on my next yank tank. 
Guest- Guest
Re: Rusting with Andy
![]() by Carps Fri 04 Apr 2008, 11:48 pm
by Carps Fri 04 Apr 2008, 11:48 pm
Thanx Andy, when it comes to rust, you're a genius.
Carps- AMCC ADDICT
- Number of posts : 3168
Age : 34
Location : Could be anywhere.
Registration date : 2008-03-21
Re: Rusting with Andy
![]() by Guest Sat 05 Apr 2008, 3:18 am
by Guest Sat 05 Apr 2008, 3:18 am
Found all the gear needed to do the rusting of cars in my local hobby shop yesterday April 7th will have to buy some and get to work on one of older kits.
Guest- Guest
Re: Rusting with Andy
![]() by Andy Sun 06 Apr 2008, 6:17 am
by Andy Sun 06 Apr 2008, 6:17 am
Im glad this tute has gone as well as it has...
Rust em up!
Rust em up!
Andy- I Love this place
- Number of posts : 853
Age : 46
Location : Melbourne
Registration date : 2008-03-21 -

allan- AMCC ADDICT
- Number of posts : 10385
Age : 66
Location : East Maitland
Registration date : 2008-03-31
Re: Rusting with Andy
![]() by zenrat Thu 06 May 2010, 2:23 pm
by zenrat Thu 06 May 2010, 2:23 pm
Back to the top.
_________________
Fred
Badda Bing Badda Bang

zenrat- Moderator
- Number of posts : 6842
Age : 56
Location : Dank Northern slopes of Mount Martha, Vic
Registration date : 2008-07-17
Re: Rusting with Andy
![]() by tezza43 Tue 18 Jan 2011, 1:19 pm
by tezza43 Tue 18 Jan 2011, 1:19 pm
Some of our newer members may have missed Andy's terrific article on rusting so here it is - bloody marvellous. 


tezza43- AMCC ADDICT
- Number of posts : 4318
Age : 80
Location : Mornington, Victoria
Registration date : 2008-03-21
Page 1 of 1
Permissions in this forum:
You cannot reply to topics in this forum|
|
|