Slum - The other side of reality
+9
RetrospectKustoms
DeeCee
zenrat
Bigdaddy0
allan
dv8v8
blatdriver
warra48
tiking
13 posters
Page 1 of 2
Page 1 of 2 • 1, 2 ![]()

Slum - The other side of reality
![]() by tiking Mon 30 Dec 2013, 4:59 am
by tiking Mon 30 Dec 2013, 4:59 am
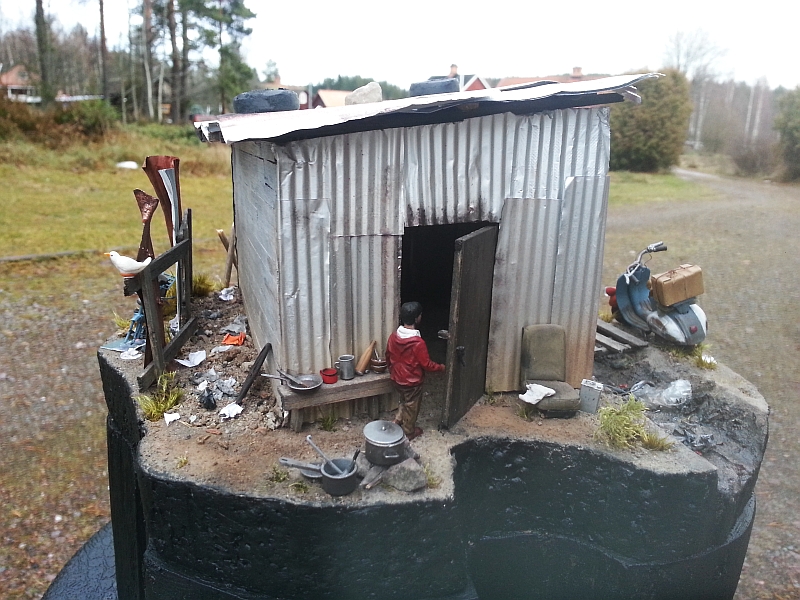
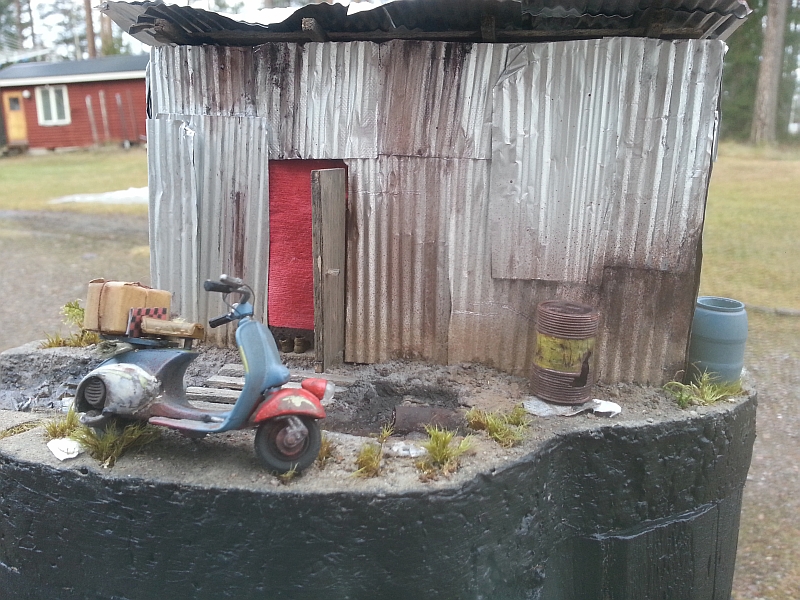
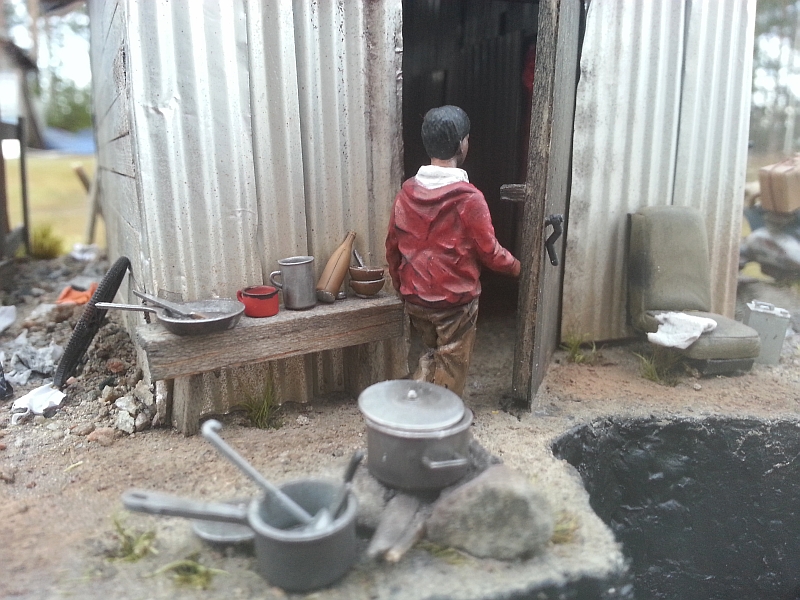
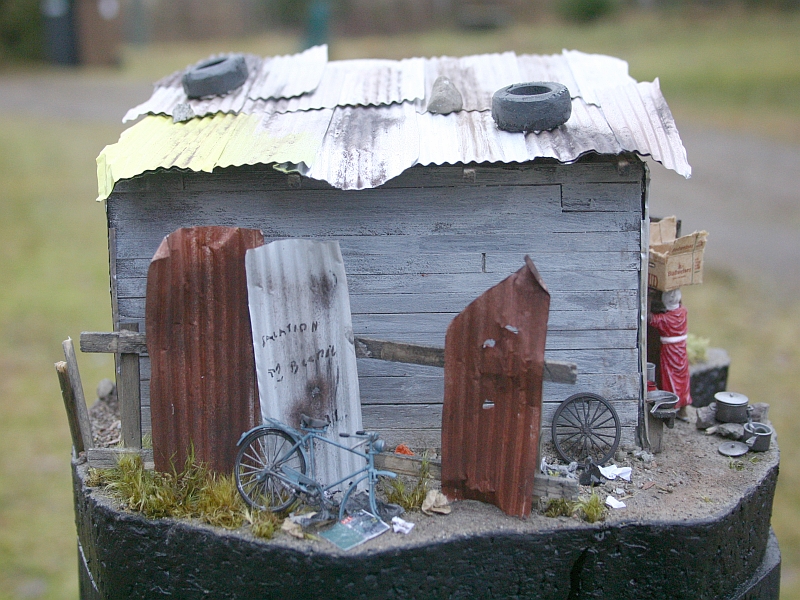
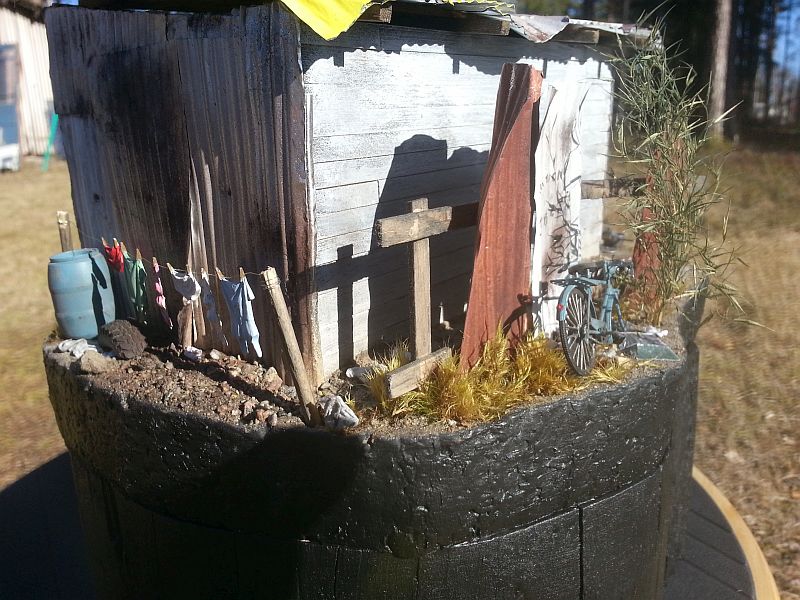
Been working on this for a while. I have been looking at many pics of Slum areas from around the world and thought it would be 'different' to model something using this subject matter as an inspiration. I have not seen many or should I say, this subject matter, modelled before. As always, I try to be different and not follow a certain trend. So here is what I have modelled so far. Still need to add some details in the shanty and another figure in side the open door way.
The corrugated zinc, were done using foil paper and a mechanism that makes the corrugated design. I bought from some store. I do not remember but you can get a similar one from Panduro. I am cheap, so I will use anything possible. But I found another material. Use aluminum platter that bakers use to put cakes or food on. I found some cheaper ones at a cheap store for very little money. I cut out everything around it and use the bottom which was perfect. Thanks for looking.
BTW, if you type in Slum in Google's search window, you will see many different types from around the world. It is a shame, all governments do not put in the efforts to change this. With all the money they put into their military and such.
Apologies for the bad photos. My camera got smashed a couple of times and the plastic has lots of scratches which leaves a shadowy cloud at the bottom of the camera. So it is hard to adjust.
I am still working on little dio. I have to paint several of the corrugated zinc and weather it a bit more. Then when I am completely satisfy, I will tone the shine down a bit more. Although, my camera is not a very good one.

tiking- I should be working on Models

-
 Number of posts : 272
Age : 55
Location : Sweden
Registration date : 2011-08-27

warra48- I should be working on Models
- Number of posts : 116
Age : 76
Location : Brisbane
Registration date : 2012-02-13
Re: Slum - The other side of reality
![]() by blatdriver Mon 30 Dec 2013, 9:44 am
by blatdriver Mon 30 Dec 2013, 9:44 am
 as always excellent details, looks good
blatdriver- AMCC ADDICT

- Number of posts : 1550
Age : 47
Location : Wagga
Registration date : 2011-04-22

dv8v8- AMCC ADDICT
- Number of posts : 5648
Location : Rockhampton QLD
Registration date : 2008-04-26

allan- AMCC ADDICT
- Number of posts : 10385
Age : 66
Location : East Maitland
Registration date : 2008-03-31
Re: Slum - The other side of reality
![]() by Bigdaddy0 Mon 30 Dec 2013, 1:55 pm
by Bigdaddy0 Mon 30 Dec 2013, 1:55 pm
Words escape me ..... I feel something coming up....... bloody nice diorama mate. You never cease to amaze. Awesome build mate. 


Bigdaddy0- I Love this place

- Number of posts : 505
Age : 55
Location : Rockhampton
Registration date : 2010-02-15
Re: Slum - The other side of reality
![]() by zenrat Mon 30 Dec 2013, 2:50 pm
by zenrat Mon 30 Dec 2013, 2:50 pm
Words fail me.
_________________
Fred
Badda Bing Badda Bang

zenrat- Moderator
- Number of posts : 6842
Age : 56
Location : Dank Northern slopes of Mount Martha, Vic
Registration date : 2008-07-17
Re: Slum - The other side of reality
![]() by tiking Mon 30 Dec 2013, 4:29 pm
by tiking Mon 30 Dec 2013, 4:29 pm
Thanks guys. Updating this dio with different colors, weathering and dull tones. Another figure inside the shanty and more added details. Will post updated photos later. Thanks for taking the time to view this thread.
tiking- I should be working on Models
- Number of posts : 272
Age : 55
Location : Sweden
Registration date : 2011-08-27

DeeCee- AMCC ADDICT
- Number of posts : 3772
Age : 57
Location : Launceston Tas
Registration date : 2011-08-07
tiking- I should be working on Models
- Number of posts : 272
Age : 55
Location : Sweden
Registration date : 2011-08-27
Re: Slum - The other side of reality
![]() by RetrospectKustoms Thu 02 Jan 2014, 11:15 am
by RetrospectKustoms Thu 02 Jan 2014, 11:15 am
That is fantastic. Interesting subject matter, very well executed.

RetrospectKustoms- AMCC ADDICT
- Number of posts : 2475
Age : 43
Location : Barossa Valley, So Aus
Registration date : 2011-12-14
tiking- I should be working on Models
- Number of posts : 272
Age : 55
Location : Sweden
Registration date : 2011-08-27
Re: Slum - The other side of reality
![]() by k1w1 Thu 02 Jan 2014, 5:28 pm
by k1w1 Thu 02 Jan 2014, 5:28 pm
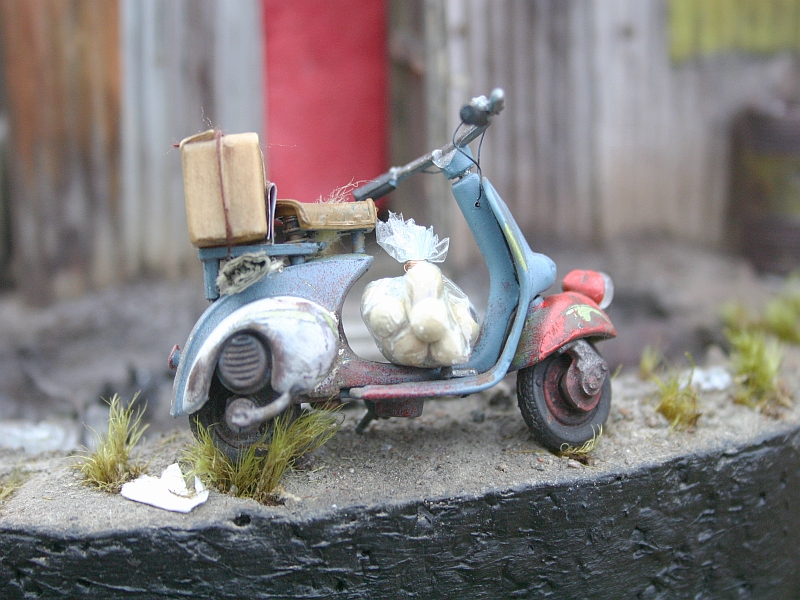
Great work. It is always good to see something a little different. Is this 1/32 - 1/35 scale. . Looks like Tamiya 1/35 bicycle and Newray 1/32 Vespa.

k1w1- I should be working on Models
- Number of posts : 171
Age : 64
Location : South NZ
Registration date : 2013-08-13
Re: Slum - The other side of reality
![]() by tiking Thu 02 Jan 2014, 7:20 pm
by tiking Thu 02 Jan 2014, 7:20 pm
k1w1 wrote:Great work. It is always good to see something a little different. Is this 1/32 - 1/35 scale. . Looks like Tamiya 1/35 bicycle and Newray 1/32 Vespa.
Good eye. Yep it is. I could not find a 1/35 so i reworked the 1/32 vespa. Added some wires and seat then weathered it. Now i saw that Diopark has a set of 1/35 vespa. So i will get them when i find it. I am almost done with this dio.
tiking- I should be working on Models
- Number of posts : 272
Age : 55
Location : Sweden
Registration date : 2011-08-27

Ray64- I Love this place
- Number of posts : 764
Age : 59
Location : Adelaide
Registration date : 2012-10-10
Re: Slum - The other side of reality
![]() by tiking Sun 05 Jan 2014, 10:33 pm
by tiking Sun 05 Jan 2014, 10:33 pm
I thought I'd do a write up on how and what I used to build this dio. Included new updated pics. So here it is:
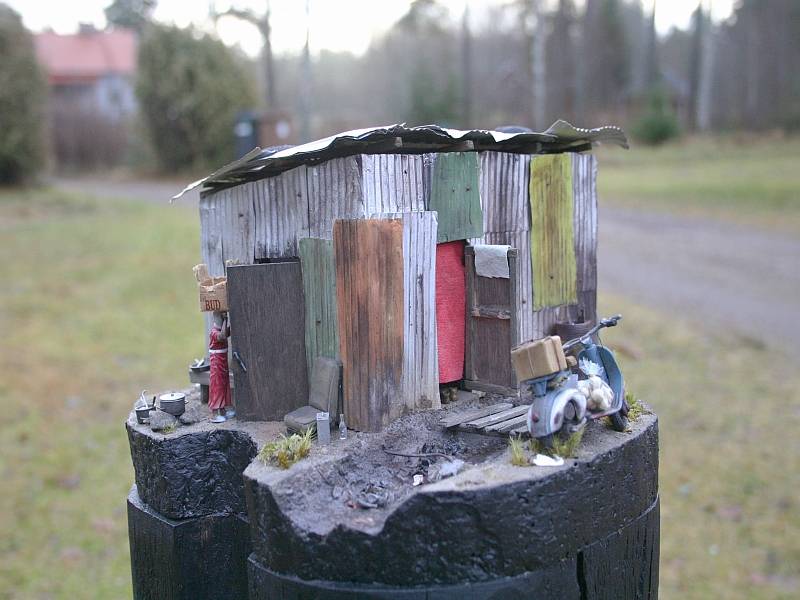
Since this was to be a slum or kind of derelict subject matter, I decided to use a wood stump as the base of the diorama. The ground work was done on a white foam board (never did like this brand but it was the easiest to come by at the time. Low funds, in short). The frame work of the shanty was an ordinary cardboard used by artist. Nothing special about it. As I mention, cheap was the main theme for me not spending too much on materials. The corrugated zinc individual pieces were done using foil sheets and a tool that gives it the corrugated design. Again, I will use anything possible to keep cost down. But I found another material. I Used aluminum platter, that bakers use to put cakes or food on. I found some cheaper ones at a cheap store for very little money. I cut out everything around it and use the bottom which was perfect.
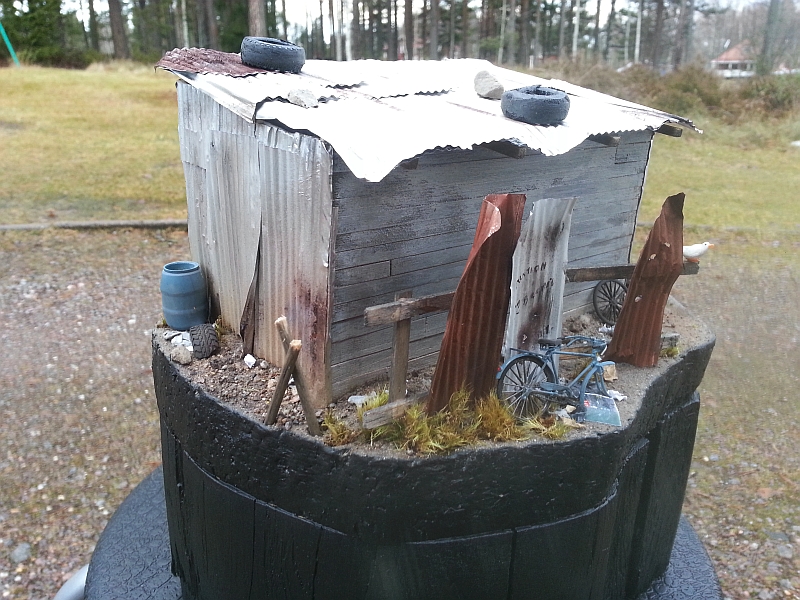
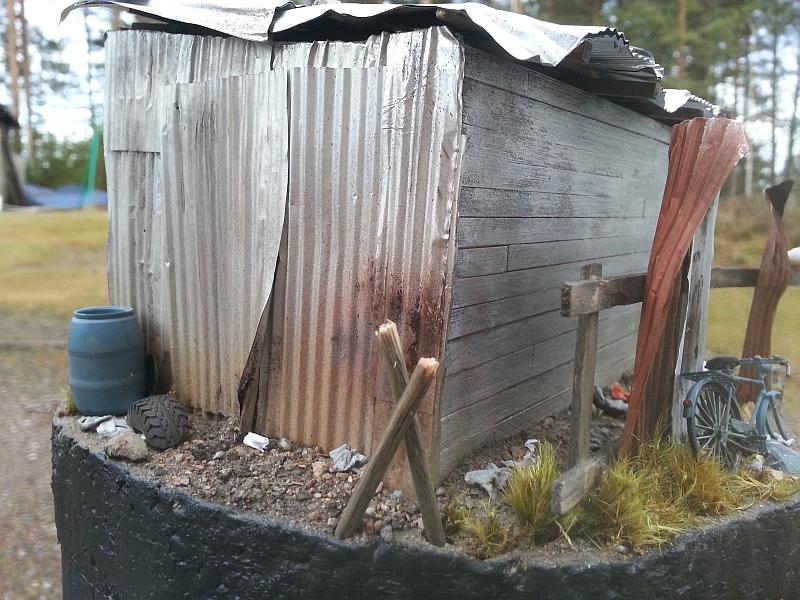
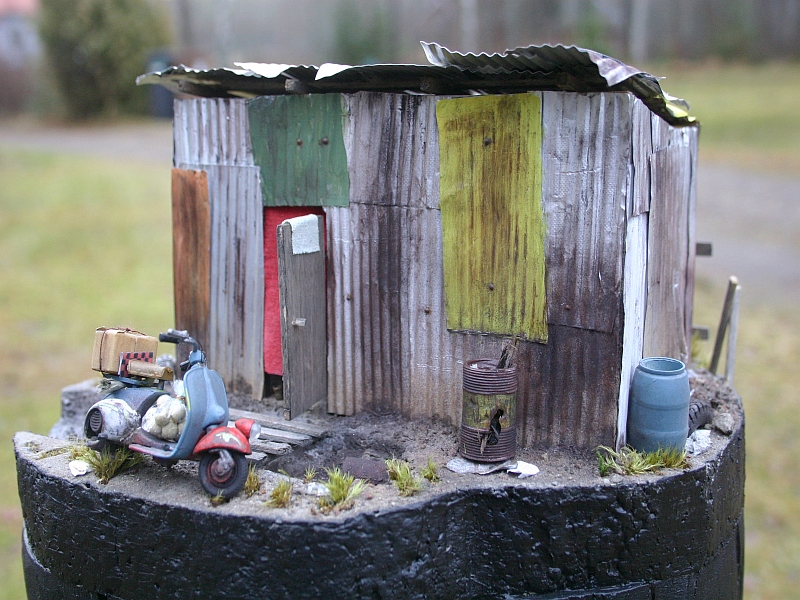
After the individual sheets were made they were glued directly onto a cross frame made from balsa, after it was painted. At the back of the shanty, I used scale wood painted first in diluted white paint and gone over in a much diluted green color. Then I went over it with a medium size brush to give it that worn look. Prior to painting the sheets I poked small holes and deformed them in various forms to give them that really old neglected and battered look. I painted most of the corrugated sheets a different color as this is done in most slum areas; at least in some of my reference pictures. I used random colors, such as orange, green, oxide Red, yellow, purple and white.
Now, for some of you, this might come as a shock to you but I still use spray cans. Yes, I know. I am stuck in time. I will buy one but have been scared off by the amount of painting you have to do between each paint job. But I will buy one for its flexibility. And of source it is cheaper in the long run.
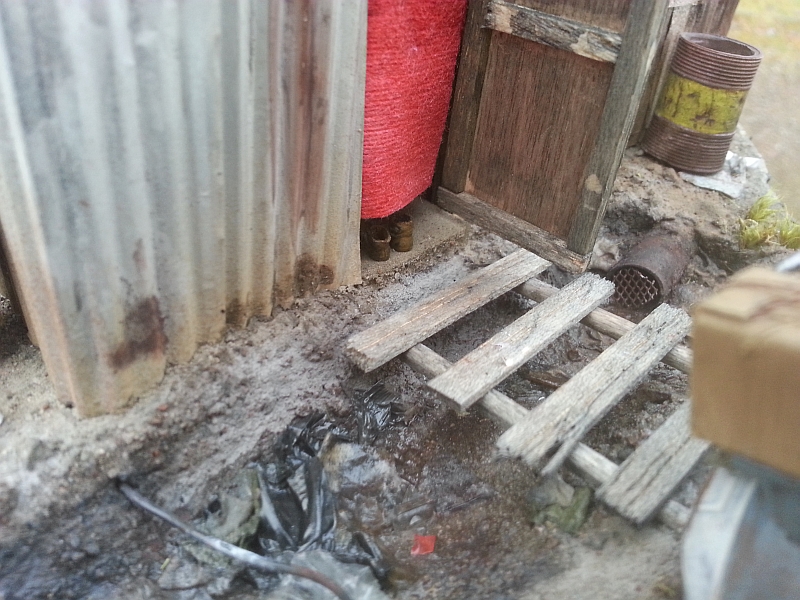
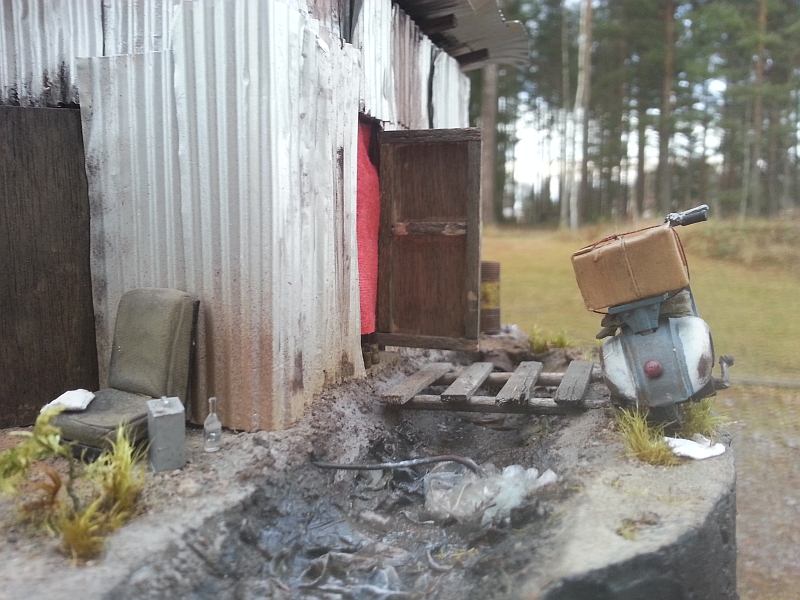
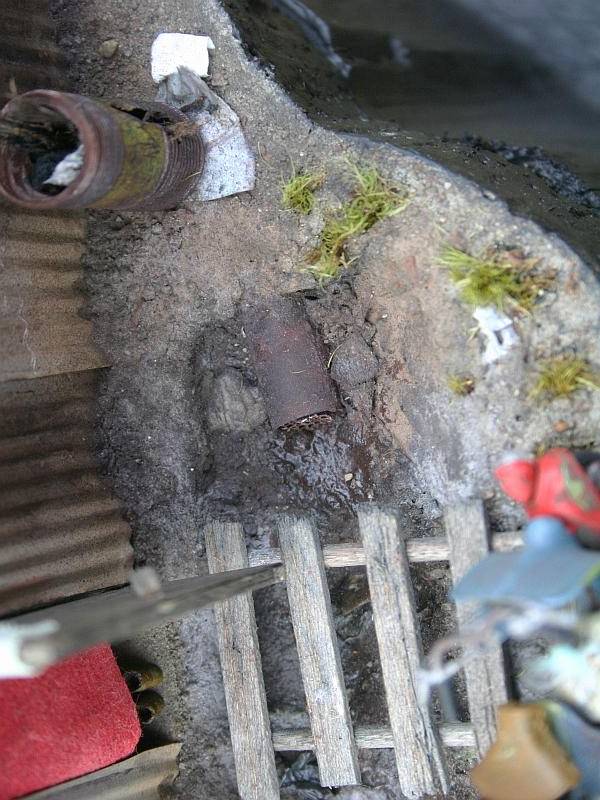
For the rusty look I used a mixture of Mig’s rust, real dirt and black pigments. The drainage ditch just outside the shanty was simply done by carving out pieces and adding miscellaneous scrap. I added everything from crumpled up paper to plastic(cellophane).
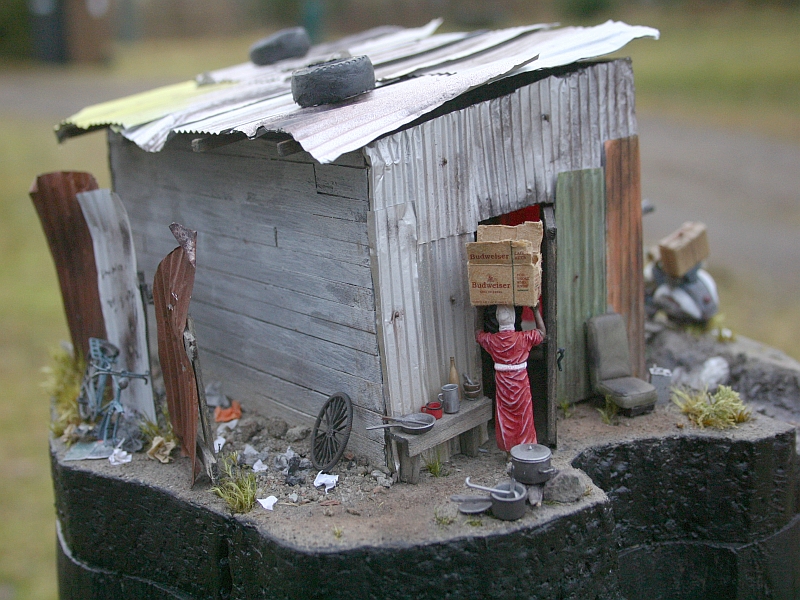
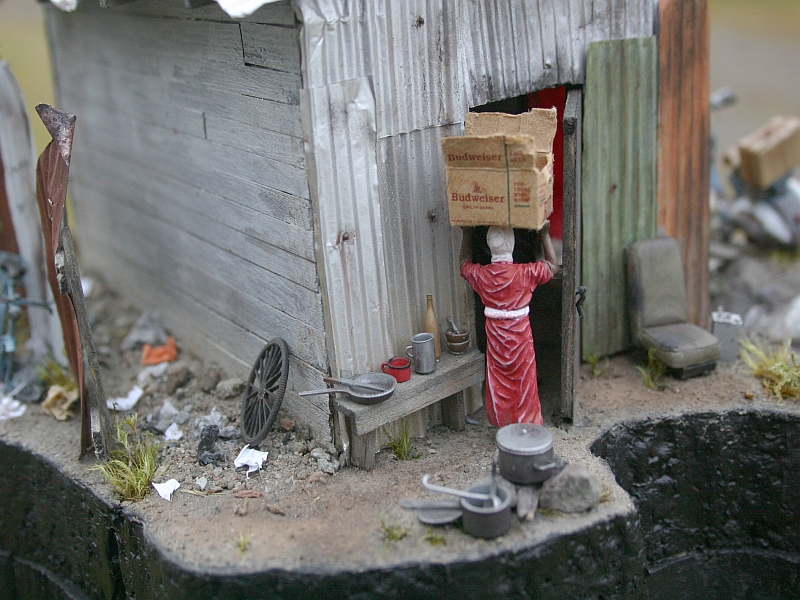
The ground is mainly done using real dirt and Mig’s pigments. I also used some no-name brand pigments such as black, grey and amber. The doors on both sides of the shanty were made from Balsa and aged by simply painting them with a diluted black paint. I then hung a red piece of cloth at the front entrance of the doorway, as usually seen in these shanties. The pair of shoes on the ground just in the doorway was taken from the same Meng figure set. I sawed off the feet and hand drilled holes in them and painted them using Citadel Leather color.
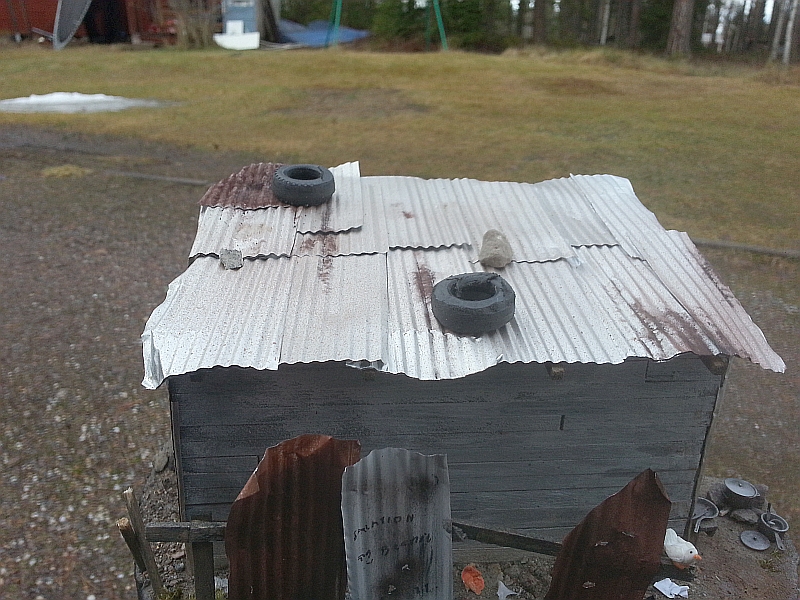
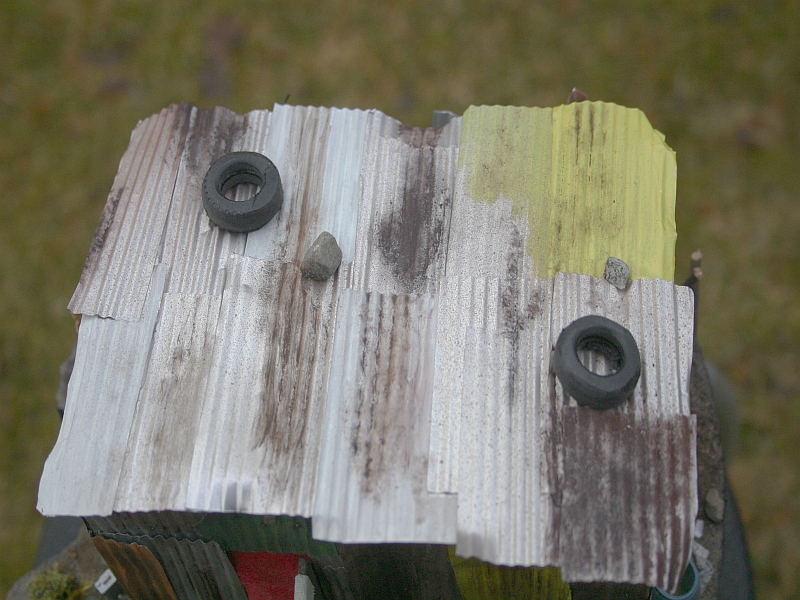
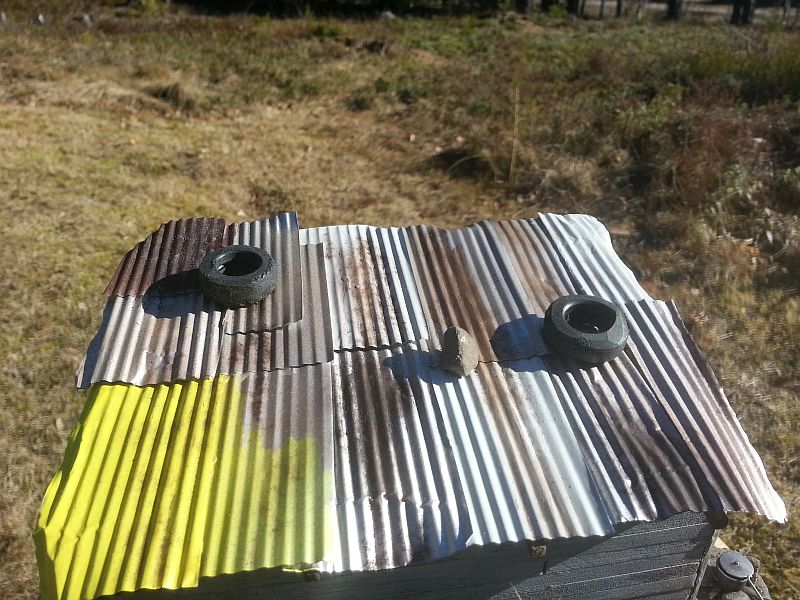
BTW, these Citadel brands are very good. If you have not tried them, give them a try. The tires on top of the shanty are used to help hold the corrugated sheets down so they won’t blow away after a storm or strong wind.
In most cases they do not help very much. But the effect on the shanty gives the model authenticity. The tires are 1/24 tires taken from another kit. I just used a grinder and removed the threads.
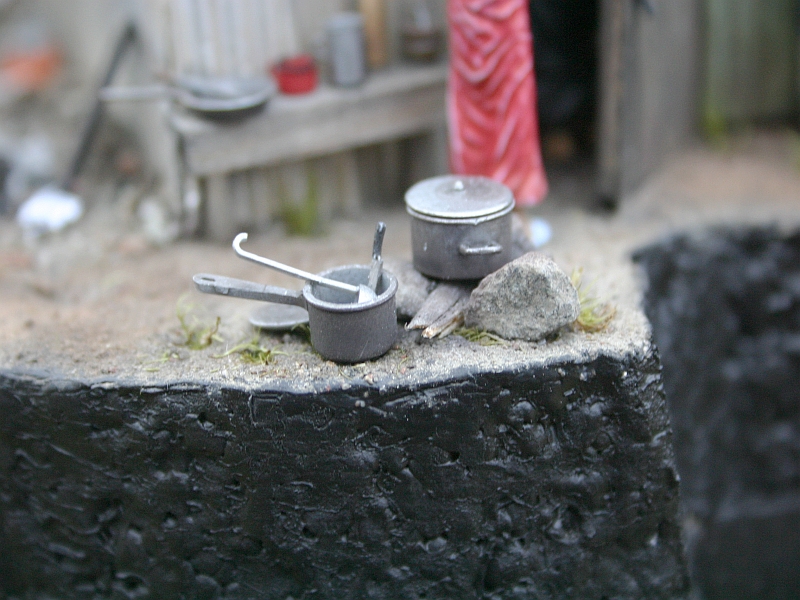
The vegetation is nothing more than finely selected moss and small plant branches I got from outside. If picked and placed right it does look the part. The figures are from Meng. The pots, pans and cutlery accessories as well as the broken down bicycle are from Diopark. I must say, that Diopark as some really nice kits. If you have not bought anything from them, then wait no longer. You will not regret.
In the cooking area, I used balsa wood, broken up in small pieces to represent fire wood; weathered with black and grey pigments to give the impression that it has been used. The pot sitting on the top of the stones has been scorch due to it being used many times over. The car seat or truck is a resin replacement seat used for the Italeri HEMTT kit. The old bench was scratch built using balsa and stained the same way using the dilute black paint method. The vespa at the front of the shanty is a 1/32 (could not find a 1/32 at the time) scale die-cast model which I modified by adding brake cables and damaged the seat to give the worn look. The modeled was then painted in different colors, red, blue, white and rusted up to create the used worn effect that would fit the scene. Added a resin box painted with a light sand color from Humbrol and weathered using pigments.
All-in-all it has been a wonderful learning experience and something to honor those less fortunate human beings around the world living in such poor conditions. We are all human beings. Let’s be kind to one another. BTW, if you type in Slum in Google's search window, you will see many different types from around the world. Peace.

Since this was to be a slum or kind of derelict subject matter, I decided to use a wood stump as the base of the diorama. The ground work was done on a white foam board (never did like this brand but it was the easiest to come by at the time. Low funds, in short). The frame work of the shanty was an ordinary cardboard used by artist. Nothing special about it. As I mention, cheap was the main theme for me not spending too much on materials. The corrugated zinc individual pieces were done using foil sheets and a tool that gives it the corrugated design. Again, I will use anything possible to keep cost down. But I found another material. I Used aluminum platter, that bakers use to put cakes or food on. I found some cheaper ones at a cheap store for very little money. I cut out everything around it and use the bottom which was perfect.
After the individual sheets were made they were glued directly onto a cross frame made from balsa, after it was painted. At the back of the shanty, I used scale wood painted first in diluted white paint and gone over in a much diluted green color. Then I went over it with a medium size brush to give it that worn look. Prior to painting the sheets I poked small holes and deformed them in various forms to give them that really old neglected and battered look. I painted most of the corrugated sheets a different color as this is done in most slum areas; at least in some of my reference pictures. I used random colors, such as orange, green, oxide Red, yellow, purple and white.
Now, for some of you, this might come as a shock to you but I still use spray cans. Yes, I know. I am stuck in time. I will buy one but have been scared off by the amount of painting you have to do between each paint job. But I will buy one for its flexibility. And of source it is cheaper in the long run.
For the rusty look I used a mixture of Mig’s rust, real dirt and black pigments. The drainage ditch just outside the shanty was simply done by carving out pieces and adding miscellaneous scrap. I added everything from crumpled up paper to plastic(cellophane).
The ground is mainly done using real dirt and Mig’s pigments. I also used some no-name brand pigments such as black, grey and amber. The doors on both sides of the shanty were made from Balsa and aged by simply painting them with a diluted black paint. I then hung a red piece of cloth at the front entrance of the doorway, as usually seen in these shanties. The pair of shoes on the ground just in the doorway was taken from the same Meng figure set. I sawed off the feet and hand drilled holes in them and painted them using Citadel Leather color.
BTW, these Citadel brands are very good. If you have not tried them, give them a try. The tires on top of the shanty are used to help hold the corrugated sheets down so they won’t blow away after a storm or strong wind.
In most cases they do not help very much. But the effect on the shanty gives the model authenticity. The tires are 1/24 tires taken from another kit. I just used a grinder and removed the threads.
The vegetation is nothing more than finely selected moss and small plant branches I got from outside. If picked and placed right it does look the part. The figures are from Meng. The pots, pans and cutlery accessories as well as the broken down bicycle are from Diopark. I must say, that Diopark as some really nice kits. If you have not bought anything from them, then wait no longer. You will not regret.
In the cooking area, I used balsa wood, broken up in small pieces to represent fire wood; weathered with black and grey pigments to give the impression that it has been used. The pot sitting on the top of the stones has been scorch due to it being used many times over. The car seat or truck is a resin replacement seat used for the Italeri HEMTT kit. The old bench was scratch built using balsa and stained the same way using the dilute black paint method. The vespa at the front of the shanty is a 1/32 (could not find a 1/32 at the time) scale die-cast model which I modified by adding brake cables and damaged the seat to give the worn look. The modeled was then painted in different colors, red, blue, white and rusted up to create the used worn effect that would fit the scene. Added a resin box painted with a light sand color from Humbrol and weathered using pigments.
All-in-all it has been a wonderful learning experience and something to honor those less fortunate human beings around the world living in such poor conditions. We are all human beings. Let’s be kind to one another. BTW, if you type in Slum in Google's search window, you will see many different types from around the world. Peace.
tiking- I should be working on Models
- Number of posts : 272
Age : 55
Location : Sweden
Registration date : 2011-08-27
dv8v8- AMCC ADDICT
- Number of posts : 5648
Location : Rockhampton QLD
Registration date : 2008-04-26
Re: Slum - The other side of reality
![]() by baZOOKa Sun 05 Jan 2014, 11:19 pm
by baZOOKa Sun 05 Jan 2014, 11:19 pm
Bloodyhell buddy ...you just constantly amaze me with your work. LOVE this. It looks so real ... and the detail is superb. Funny how governments can find billions to launch rockets but cant find the money to help out the homeless.
Great take and interpretation on the subject.
Great take and interpretation on the subject.

baZOOKa- Legend Poster
- Number of posts : 1409
Age : 66
Location : Beautiful Greenbushes WA
Registration date : 2011-07-15 -

tiking- I should be working on Models
- Number of posts : 272
Age : 55
Location : Sweden
Registration date : 2011-08-27
Re: Slum - The other side of reality
![]() by Jerry Ol'55 Fri 11 Jul 2014, 9:35 pm
by Jerry Ol'55 Fri 11 Jul 2014, 9:35 pm
tiking wrote:Thanks Dean.
I just came across this post and had a look, (posted around 2011 & hope this
modeller/artist is still putting out some work) and had a look....
Just beautiful work!... and yet so sad to think that yeh!... billions of $$$ can be
spent on ridiculous research, technology or space flights etc, while people out there
are doing it tough without reasonable housing and going hungry.
Sorry... No more soapbox from me!.. Beautiful diorama mate!, as they say...
"A picture is worth a thousand words"!
Jerry

Jerry Ol'55- I Love this place
- Number of posts : 639
Age : 68
Location : Gosnells W.A.
Registration date : 2014-06-03
Re: Slum - The other side of reality
![]() by tiking Sat 12 Jul 2014, 5:34 pm
by tiking Sat 12 Jul 2014, 5:34 pm
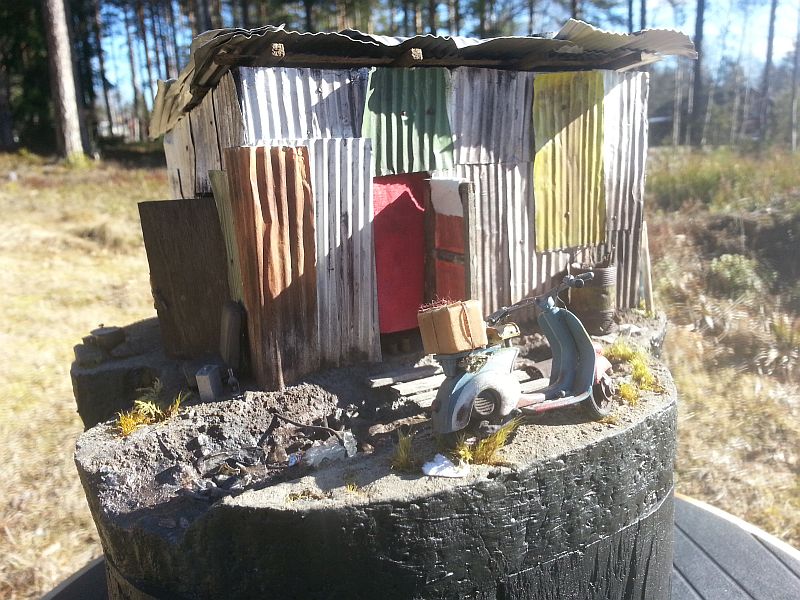
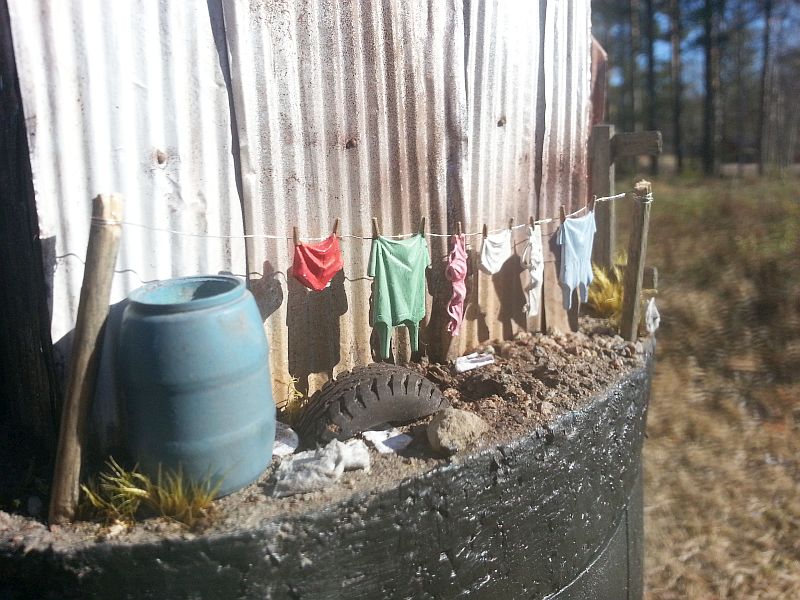
Thanks Jerry. Last update on this dio:


tiking- I should be working on Models
- Number of posts : 272
Age : 55
Location : Sweden
Registration date : 2011-08-27
dv8v8- AMCC ADDICT
- Number of posts : 5648
Location : Rockhampton QLD
Registration date : 2008-04-26
Re: Slum - The other side of reality
![]() by baZOOKa Sat 12 Jul 2014, 8:29 pm
by baZOOKa Sat 12 Jul 2014, 8:29 pm
Speechless... absolutely brilliant. Glad to see your still around ticking. Bout time for a new dio isnt it ...hehe!
Hope all is well with you.
Hope all is well with you.
baZOOKa- Legend Poster
- Number of posts : 1409
Age : 66
Location : Beautiful Greenbushes WA
Registration date : 2011-07-15 -
Re: Slum - The other side of reality
![]() by tiking Sat 12 Jul 2014, 10:12 pm
by tiking Sat 12 Jul 2014, 10:12 pm
I am well thank you Dean. Just finished another dio.
tiking- I should be working on Models
- Number of posts : 272
Age : 55
Location : Sweden
Registration date : 2011-08-27
Re: Slum - The other side of reality
![]() by k1w1 Sun 13 Jul 2014, 10:21 pm
by k1w1 Sun 13 Jul 2014, 10:21 pm
I see you have added a washing line. Looks good. Clothes pegs must have been difficult. And Bra's in 1/35 scale .........
Have seen pictures of your most recent diorama - looks great.
Have seen pictures of your most recent diorama - looks great.
k1w1- I should be working on Models
- Number of posts : 171
Age : 64
Location : South NZ
Registration date : 2013-08-13
Page 1 of 2 • 1, 2 ![]()
Page 1 of 2
Permissions in this forum:
You cannot reply to topics in this forum|
|
|