1968 Plymouth Roadrunner COMPLETE 2-19-2017
Page 1 of 2 • 1, 2 ![]()

1968 Plymouth Roadrunner COMPLETE 2-19-2017
![]() by Hemi Fri 10 Feb 2017, 8:36 am
by Hemi Fri 10 Feb 2017, 8:36 am
Now, I'm gonna get ahead of myself, as I been planning this the whole time while not online. BUT before my accident in July, back in June, I took my completed '57 Chrysler 300C to the local hobby shop for display, only to find they had an up coming model contest! So, I thought, why not? I entered it..... And let the car there on display. Granted, not thinking this accident was going to happen but, that '57 300C, was made to have 2 hoods, both different, one with the car on display, one at home hanging in the shop. So, then July 3rd happens, I'm in the hospital for a week..... A month passes, I finally get to be in the shop talkin with my wife (shes got a craft bench in the shop for us to spend time together) Even tho, I wasn't able to do anything, talking with her and looking at what I all had, was a mind set on how or what I was gonna do to the "mess" in the shop, or a model I may have had her to open up for me. WELL all the times I was in the shop, I kept seeing this "second hood" to my '57 300C.... And then thought over and over "John, you need to go to the hobby shop, John you need to go to the hobby shop" so about a month and a half passes AFTER my accident and I ask the wife to drive me to the hobby shop..... so she agrees to take me the following day! Remember, I was unable to drive from July 3rd till October 15th.......
So, anyway, I get to the hobby shop, walk in, and the first thing, ALL employees there look up, and see me and say "HEY you WON!" Regular guy cashier looks at me right after that and goes, WHAT THE H**L HAPPEN man? I look at them and said, O----K, what I win and WHY? (I totally FORGOT about the model contest!) And they reminded me, and then began to say what all was what and so on, WELL, the judging for the contest, was on July 4th....... I was in the hospital! I then went on to explain what you all know, what and why I was in the shape I was in. WELL to continue on, there was 12 judges (was a bit bigger contest then I first had thought) that I got all "1st place" judgments on, which gave me a "Best of Show", as well as a 1st place. Win? 2 models one for each placement! I got a '69 Ford Shelby GT-500, AND a '96 Dodge Dodge Ram VTS Ram. The Ford well.... took a wild ride on the trade-in thought and mindset to bring home a '68 Plymouth Roadrunner, from the shop. Not a bad win I must say! SO, this '68 Roadrunner was gonna be the model, WHEN I was able to, be thee first model to be "tested" on to see what I was able to do when my hands were well enough to work on a model (YES I know, started yet another model John, thats all you needed to do! LOL) BUT all the rest, were already started, one. and two, I didn't want to ruin any of them I already had strong efforts invested into, and three, to show start to finish (if not close to being finished) what my mangled hands were able to do..... On a single model! Ruined, or not......
So like always, I started with the design of the car, what it was gonna have, what the engine was to be, type of transmission, etc. WELL the AMT '68 Roadrunner came with a 426 Hemi. Just. couldn't do it, wasn't feelin' a Hemi in this one! SO, being a Roadrunner, I went the "basic" approach, the 383..... 4 barrel "383 Roadrunner" engine, with a automatic 727 Torqueflite transmission (I went against ALL this model came with!) -Just because, I'm me, and can. I did the following, with 2 fingers only, on my right hand, pointer finger and thumb, Well one finger and one thumb I should have said. That was ALL I had for use on assembling the engine. My entire left hand was wrapped right up only having an exposed thumb on my left hand but wasn't usable for anything as it had massive wounds under it in the palm area, and pressure on the area where the pins were was dang near unbearable at the time.


Now something to point out here, notice how the engine is being held? NORMALLY I didn't use my "3rd hand" tool, BUT having less then a full working hand, I made up the difference! I have several of these, and this is one time I'm glad I had all of them, that I do (My wife actually uses them for crafts WAY more then I do! Now the other part of reality is, to get the engine out of my storage containers, took a bit, and then to open up a small zip-lock baggie that held heads, a separate one to hold the valve covers, was then an interesting task..... I won't go into the not-so-graceful way I went about it, and then using a set of tweezers to pull out loose parts in an organizer was fun too, but thats how I got the intake out, and then had to sort through them to see what one best fit the engine, as well as pull it out to use in 2 halves..... I got that all sorted and out in ONE NIGHT (Nothing absolutely NOTHING went fast or easy!) BUT, then again, all I had was time, right? The following night, I went on to assemble the block halves, messing with a mini plastic clamp till I was ready to through that dang thing in the dump LOL BUT I didn't give up, as you can see..... YES I fooled around, and cursed things not done in prior history, BUT, I didn't give up, wasn't about too..... The oil pan, also came out of an organizer, as well as the timing chain cover/water pump.
Needless to say, I spent the better part of 5 days to get this engine to where you see it here, maybe even longer! It once took me about a day to get a motor to this stage, but with my hands as they were..... Well, I'm not gonna kick myself over it any longer, I did it, and kept going. BUT part of the issue was trying to re-learn how to use/do things, with hands in the shape mine were. Sadly thats all behind me now, BUT, the one thing, that did not FAIL me at any given time, was my Unimat! I was able to use, control, set up, take down, re-adjust, you name it, with ease! I did A LOT of machining when I was hurting for the accident as it didn't phase me, when I was sore, it didn't make it worse, when my arms or fore arms were tired for over compensation. helped to give me something to do when the hands just hurt to bad to do anything but I wasn't tired to go to sleep, you name it, that one machine has been usable through this whole ordeal! -Needless to say, once I'm back at modeling fully, I got a bit of supply of parts, as well as some new things, to mold, as I made A LOT of parts not found or easy to get these days, from pictures online that I had before all this happened so I just sat down and went like a mad man on the machine when I couldn't stand doing anything else, but couldn't just not do anything......
Painting this motor, well that was an ungraceful thing too! LOL I broke a round bottle of custom mixed paint I made up to get this shade of Turquoise, for the Mopar engines of that color as its REAL close, if not dead on. Done before my hands got mangled, BUT in order to make this engine as it would have been in '68, I needed that bottle of paint open, AND it happened to have been put into a 1/2 ounce ROUND bottle.. the bottle I to this day, can't open! I literally sheered the top of the bottle off, as I tried gripping and turning the lid with a pair of vice grips in my 2 fingered right hand, as it was clamped in a bech mounted Pana-Vice.....
Between the vice jaws and the vice-grip pliers, I made one hellofa mess LOL Needless to say, I got the engine painted, in all of it, BUT I had a mess to clean up at the same time, NOW however, that Mopar engine Turquoise is in a square Testors thinner bottle!!!!!!! One of the big ones, 1.75 Ounce bottles as I had quite a bit, mixed up. In the end, I only lost 1/4 ounce of paint. Still ouchin over that one, not that it hurt me, but the paint loss, hurts (Its a custom mix I did with paint I can no longer get!)
About a week in on this model, I on-and-off worked on other things too, as I mentioned, made up a LOT of master copy parts for molding when I'm able. I to date still can not hold a container, that has "stuff" in it, and use the other hand to mix it by stirring, how mold making/pouring is done. When I'm able too tho, I got A LOT to make molds for...... (I want to post them, but I have to see if there is an area for it) IF there is, I'll post a link here to see what I machined out.
More to follow! Stay tuned....
Last edited by Hemi on Mon 20 Feb 2017, 11:26 am; edited 2 times in total (Reason for editing : Title Line Update)

Hemi- I should be working on Models

-
 Number of posts : 320
Age : 46
Location : New Hampshire, USA
Registration date : 2016-10-12
Re: 1968 Plymouth Roadrunner COMPLETE 2-19-2017
![]() by Hemi Fri 10 Feb 2017, 8:36 am
by Hemi Fri 10 Feb 2017, 8:36 am


Exhaust manifolds in place, and painted by brush. As well as Carburetor picked out, was chrome, dullcoted and also in place! I also went as far as to remove the kit part "oil filter" and replaced with one I had made some time ago, and also painted.


Just the other side, and I went as far to paint the little mechanical fuel pump, silver! I also added a aluminum turning I made on the Unimat for a valve cover breather!


Got a glue bomb starter, touched it up a bit and added it, simple painting of semi-gloss black, NO WIRES as I normally would have done! I wasn't going to try and press my luck doing/adding them, enough is enough at times when your not at 100%, and thats a hard pill I had to swallow...... BUT, shows a bit of what I am or was able to do when I was atthe worst part of this!
THEN, it hit me...... REMEMBER this model was made to have the 426 Hemi in it!!!!! The issue with that is about to come, the 426 Hemi has two 4 barrel carburetors on it, and the 383 had a single 4 barrel carburetor on it. Problem here? I had to come up with something OTHER then kit supplied air cleaner! SO, went looking through my extra parts organizerfor a suitable air cleaner. Sadly, NOTHING I had looked the part to that found on a real Roadrunner engine with a single 4 barrel carburetor air cleaner! -to the Unimat I went.....


Seen here turned, but unpainted! Was made from a slab of plexiglass I had laying around, and was EASY to get it into the lathe for turning! Seeing it, in real life to whats seen here is difficult to tell BUT, it has ALL the dimensions of a real one, angles and all as well as ridges to be painted up to look the part! And I'll add here, it sits quite nicely too, as the real ones sit on the carburetor kinda like a "top hat" and was a high sitting air cleaner (wasn't till '69 that they were lower sitting on the engine!) -For good reason tho, in '68 the power bulges on the hood were ornamental only. they really did not pull in fresh air from the top of the hood! In '69, they were operational and did just that with duct work UNDER the hood, to make them functional, and that required a lower stance to fit the duct-work to the underside of the hood! '70 brought along the "Air Grabber" hood scoop!

ENJOY........ More to follow...... (I actually did get a ways on this model!)
Hemi- I should be working on Models
- Number of posts : 320
Age : 46
Location : New Hampshire, USA
Registration date : 2016-10-12
Re: 1968 Plymouth Roadrunner COMPLETE 2-19-2017
![]() by Hemi Fri 10 Feb 2017, 8:36 am
by Hemi Fri 10 Feb 2017, 8:36 am
ANYWAY after the last pictures were posted and you see whats been done, I seen the doctor to have the broken finger "pins" removed..... THIS opened up a whole new advantage for me. I BEGAN detailing again!

SPARK PLUG WIRES on it, with my style distributor, but NOT "in-place" as to being cut to length, and tidied up to look as tho it was in a car, and have the wires placed naturally. I turned out a TON of distributors during those machine times I wasn't fighting to work on the model so I'll have a supply of them for when I'm back to full force modeling again.

Just a bit better shot of the distributor!

One side, showing how the wires look loosely "placed"..... I also painted the oil fill cap in the valve cover as well prior to adding the wires!

Same thing, other side!

A view showing the distributor "Drive stem" that mounts into the engine. This is an all one piece turning from scrap plastic........ I make all of them this way as it uses up a bit of scraps to keep the pile down to a minimum, BUT gives me parts to use as I build!

A little extra/further detail......adding wire looms (Thanks to a friend, Dale, for the idea! I LOVE IT!) Starting to take shape for the "John's regular added details" and being able to do it without a lot of trouble..... The hands, having a broken finger on each hand, and have both of them have pins to hold the bones secure was a real issue, trying to do things, even the most common thing, modeling or everyday life was a challenge! BUT once the pins were removed, I gained a lot of control in dexterity, AND alleviated a bunch of pain I was in as the pins were creating pressure points that made things hurt and be sore. Once removed, that part of it was ended.
That whole one "first" surgery, opened up a bit more being able to do detail work!

A bit more, the single wire "up-in-the-air" is for the coil, ALWAYS the center wire, and ALWAYS the longest when I make my distributors..... Makes placement easier to do.....
Stay tuned, More to come! I at the point this was, had to sit the motor down a bit, and do something a bit elsewhere as it got to be a little much on the engine, so I took and began the frame!
Hemi- I should be working on Models
- Number of posts : 320
Age : 46
Location : New Hampshire, USA
Registration date : 2016-10-12
Re: 1968 Plymouth Roadrunner COMPLETE 2-19-2017
![]() by Hemi Fri 10 Feb 2017, 8:37 am
by Hemi Fri 10 Feb 2017, 8:37 am

Front suspension in place, and all painted, with a flat black paint job to look or represent undercoating, and a clear coat of Matte "Semi-Flat" to give it an even look and a little texture as the real undercoating would look. This "spray is done with a spray can. Now, let me tell ya, it was a trick in itself to hold a spray can, with a bad hand, and be able to spray, and I used my THUMB on my right hand to push the nozzle in, holding the can with the rest of my hand...... Interesting way of doing it, BUT It worked and the frame turned out well! I was a bit weary on doing it that way but it taught me a little of what you can do when things aren't what they should be and compromise.....

Needless to say, it wasn't to bad doing the fuel lines, as you can see, they are simple bends in copper wire and painted Aluminum with a brush. BUT, that little valve body, for the supply and return line was a fun one to make with what I had to work with for hands! BUT, I fought through and did it! AND it looks good!

Long view of the fuel line plumbing. Mounted pretty good too and look good! When I painted the frame before ANY of the plumbing was done, I painted the fuel tank as tho it was treated too. The old metal fuel tanks a lot of times were painted with a glossy black "Epoxy paint" to prevent road grime from rusting them up.... Which looked a bit different then the undercoating on the frame and floor pan!
The fuel tank treatment took almost an entire night to do! REALLY! I had to work with tape to get it around the tank, and then burnish it down BEFORE cutting it around the take to get that clean sharp edge from one color of black to the other BUT also to prevent runs and bleed-under..... With my hands at the time, it was something, and gave me something to do, and I'm just the type if I'm gonna do it, might as well do it right the first time no matter what that might take...... -as frustrating as that might sound, I seen it through and the result is seen here!


Now a closer shot of the fuel tank and treatment. I am gonna point out here a flaw............. The fuel lines...... where they both enter the tank, should have "fittings" little brass colored parts, kinda like spark plug boots, that I fought to try and do for 2 DAYS, I just could NOT get the danged things to go over the wire, without bending it badly, and had to just settle for the wire fuel line entering the tank and call it "good". Took a bit to swallow that but, I had too or the frame, well still wouldn't be done! Remember, this whole build for what you can see, was done with a partly working right hand, with only 2 working fingers! A thumb, and pointer finger! -So you might say, I was limited!
I'm over it now..... We really are our own worst critics when it comes to our work!

Notice the front suspension, the axle "spindles" are missing, I did NOT add them at
this time! And you'll see why in a bit!

Seen here in the picture there is a "white" block. thats the mount for the rear brake lines that are to come! This will be seen painted semi-gloss black, to look and stand out just a tad.

Then you have the other side! I had to make the brake line that goes to the rear axle/differential. Much the same as the fuel lines, BUT a single line, one, and two, a bit different color of silver, and mounting ever-so-slightly different then the fuel lines!

Brake line triple valve/manifold that is supplied brake fluid from the master cylinder that is almost directly above, on the firewall.
More to come..... Stay tuned!
Hemi- I should be working on Models
- Number of posts : 320
Age : 46
Location : New Hampshire, USA
Registration date : 2016-10-12
Re: 1968 Plymouth Roadrunner COMPLETE 2-19-2017
![]() by Hemi Fri 10 Feb 2017, 8:37 am
by Hemi Fri 10 Feb 2017, 8:37 am

Also, BOTH manifolds can be seen well here, one for the fuel supply and return line, that will connect to the mechanical fuel pump on the engine when its in place, that will be a hose. Then the master cylinder brake manifold that will be connected to the master cylinder, and the front brake lines through the frame rails.

Because of the way I changed the engine type, and having the rear of the brake line in place, I HAD to do the rear most exhaust pipes. The mufflers are thee only stock kit parts for the exhaust, As I had to make the pipe work match in diameter of that I custom bent from Aluminum wire, as it was a bit different in diameter from the kit supplied exhaust pipe. I also made my own mounts to go right where the stock location was as well.

Little bit better view, also seen here is the brake line "end" that will connect to the rear differential for the rear brakes! On its mount, and fittings to it, installed.
I sat the frame a side as well with the engine to get into the rear differential so that it could go into place as I had to do as much "frame work" as I could as the engine itself, remember is different from that came with the kit, changing the drive shaft length, and so, I got the exhaust in place, to be able to add the rear axle to the frame as all that pipe work for the fuel lines, the rear brake lines as well as the exhaust ALL lead under the rear differential! SO, ALL of that had to be placed first, and the rear axle, last..... I did not get pictures of the rear while detailing it, BUT had a serious mishap with its assembly, the glue puddled up on one side of the axle, and basically melted it in such a way that I had to cut it off the rear pumpkin, and turn a new one from scrap plastic and replace it. Fit well looks the part, and is solid, as well as fits the stock wheel backs! It then got its treatment of details, brake line across with fittings, as well as once on the model the rear brake line was connected to the brake line on the axle. What a fun task that was (sarcasm)......
Stay tuned, More to come!
Hemi- I should be working on Models
- Number of posts : 320
Age : 46
Location : New Hampshire, USA
Registration date : 2016-10-12
Re: 1968 Plymouth Roadrunner COMPLETE 2-19-2017
![]() by Hemi Fri 10 Feb 2017, 8:37 am
by Hemi Fri 10 Feb 2017, 8:37 am

So you see that the plug wires are in place, neatly tucked as they should be, with wire loom wraps, as well as the carburetor fuel line and filter in place, followed by the coil and its wire in place! The fuel filter is difficult to see in this shot, but it is there in behind the distributor, kinda right behind that, and the draped plug wires in the front. -I even went as far as to try and add "boots" to the plug wires and the coil, and now that my dexterity was better, I was able..... SO, the plug boots are on the wires, as seen on the coil as well. What fun it was, but it was exciting to see that I finally could get just that step closer to my normal detailing self!

Now ya can see the fuel filter, not well, but you can see it, as well as the draped wires from the distributor off the other side of the engine too!

Side view, showing the wire looms in place, as well as the insert PCV boot in the valve cover. Also pictured, the engine WAS a MPC 440, that had a standard transmission on it, JUST the bell housing. I removed that and replaced it with one of my own 727 Torqueflite transmissions, just to be different. This seen transmission is one of my resin parts! I'm glad I had extra's of them made up, as mold making, and mold pouring right now are near impossible without more waste then good usable parts!

Now you see the PCV valve in place, with its connecting hose to the carburetor, from the valve cover. Also seen here was a VERY fun part to make, the little danged oil dip stick! I had a terrible time making that even with my hands being better, but, I fought through and there ya see it! -I'm impressed over the fact that I could do what you all see here, it was trying, to say the least, BUT all of this aided my healing and helped with the dexterity of my hands while healing, and not "hurt" or hurt myself, doing it! Having said that, I also went as far as to adding the carburetor linkage, AND return spring! Also all seen here!

side view showing the throttle linkage and spring a bit better. As well as the throttle cable going behind the engine that will lead into the firewall once in place! I also painted a bit onto the transmission as the other side got the transmission dip stick because its and automatic transmission! I left the end unpainted, to have a place to hold onto it without marring the paint as the paint seen, is the first light coat, it will get a complete coat, and then once dry a light second coat to even it all out.

This shot, rear of the engine furthermost corner away you can see a gloss black wire, thats the trans fluid dip stick "handle" or pull. Very basic engine, but serves a purpose, not over complicated, and looks good all in the while. Thats what the '68 Roadrunners were about! Simple, powerful and effective, at a good cost, NO wonder they sold so many of them!
More to follow, stay tuned!
Hemi- I should be working on Models
- Number of posts : 320
Age : 46
Location : New Hampshire, USA
Registration date : 2016-10-12
Re: 1968 Plymouth Roadrunner COMPLETE 2-19-2017
![]() by Hemi Fri 10 Feb 2017, 8:38 am
by Hemi Fri 10 Feb 2017, 8:38 am
SO, this is where trouble starts. I had to pick a color for the car. Remembering that if I am to finish this car, I'd have to pick a color that I could spray paint on with a spray can, NOT my air brush! First color that came to mind was some sort of red...... SO, red it was, BUT what "shade" of "red" was I to use....... I did a couple days of research online to see what colors of red these cars came in, in '68...... Plymouth Roadrunners were very basic, standard colors as the '68 model year, was thee first year for the Roadrunner. Wasn't a lot of options to choose from to say the least, Plymouth "Tor-Red" (Same as Dodge "Hemi Orange"), a bright red, Plymouths "Matador Red" (same as Dodges "red"), and then Chryslers Red was "Scorch Red", as well as Imperials "Flame Red". SO this color was my best choice, and Testors red 1103 in the 1/4th ounce bottle, OR Testors red Spray paint 1203. SO thats what it was gonna be, it was close (NOT exact) but close enough for me. NOW that I had a color for the body, how was I to spray it? I got lucky! I had the 1203 Testors red in a spray can! (Chalk one up on John's paint inventory!) So, I got the engine compartment made, the firewall, the inner fender wells, and the radiator core support all assembled, NOT detailed and began spraying much the same way I did the frame, with a bit smaller of a can so it was just a tad easier to do!
Once painted, and dried good, (sat about 2 days) I gave it a light coat of clear lacquer gloss to make it shine as well as the body will when I get that far, ALSO in a spray can!
Once that had all dried, and sat for 2 days to all dry to be handled for detailing, I began working on other aspects to fill in the time. As your about to see....
So having said that it was time to think about wheels. What rims was I to pick for this car? My first thought was steelies, with dog dish hub caps, BUT I didn't have the correct ones, and so, I wasn't about to use my Rallye rims on this car, (I have others getting those rims! As I favor the Mopar Rallye rims!) So yet again, back to the parts organizer I went... I wanted something, but what? I really wanted to use Steelies but, I didn't have the right hub caps to fit and the tires I had are on another model so I had to pass and come up with another idea.
So as it stands, I'll be putting Mopar "Magnum 500" rims on this one! (Not my choice of rims), BUT will look good and they're from another model kit that I want the Mopar Rallye's on ANYWAY So, they won't need to be stored in an organizer! SO..... Heres what they look like from what I did!

I took a paint stick I use to hold things to paint, added tape to hold the rims and brush painted the center parts semi-gloss black, and allowed to dry, once dry, went back and drilled holes to add valve stems to them, which can be seen from the lower edge of the stick, on the rim, super glued from the INSIDE of the rim, to not have the chrome fog up with the white stuff the fumes create!
After a day worth of that, and picking details (took a bit to pick out rims and make sure they fit the tires as well as the wheel backs). I then checked to see if the engine compartment was ready for detailing, and it WAS. SO, off we go..............

SO, the first thing done was painting all the electrical boxes on the firewall semi-gloss black, and then to get it all right, a bit of online research to make sure. Painted the wiper motor gloss black, and then it was off to the races with wiring and plumbing, so the first plumbing done was the front brake cross-over line, that will couple to the valve manifold on the frame, and run across both ways to be plumbed into the frame with a brass fitting on both ends, and mounted to the firewall just as if it was a real car!

Wiring is NEXT..... The holes drilled for the battery cables, the starter, the coil, and alternator..... I used ALL wire scraps from previous model builds to lesson the amount I had laying around for the short stuff! I try to use up as much as I possibly can to not have so much laying around and have to store all the scraps.....
Stay tuned! More to come!
Hemi- I should be working on Models
- Number of posts : 320
Age : 46
Location : New Hampshire, USA
Registration date : 2016-10-12
Re: 1968 Plymouth Roadrunner COMPLETE 2-19-2017
![]() by Hemi Fri 10 Feb 2017, 8:38 am
by Hemi Fri 10 Feb 2017, 8:38 am
SO, moving on with it (I'm posting EVERYTHING new so having said that these picswere taken as I was working, as difficult as it was, I wanted to be able to have something to show for my "healing model" and this is just that!
Next up as far as the build, Well continue on with the frame.... I also had to get the drive shaft ready too (different length as the engine is different) so.....

The rear having issues being assembled, looks pretty good tho! (I'm surprised it came out as good as it did) Closest line to you in the pic thats the rear brake line supply, seen just in from of the axle going across, nearest the well well you can see the mount that was a white block painted semi-gloss black and had to have a few fittings added to it as the line then goes from a "hard line" to hose for movement of the axle up and down in motion. This is also represented in a painted line in Testors "rubber" paint.
One of the things I don't normally do, that I HAD to do on this model was add the wheel backs to the axle. This was due to the axle getting melted from the glue and having a new "end" made to fit the existing part. Because of its design and the new added section to replace the bad area, I had to get the length and mount right to hold the wheel back. SO I could have done just one side, BUT when the time came to add the tires and rims, it would have made that difficult with the circumstances my hands were in during the build.
So, while that was drying, I got to looking at the drive shaft, WHAT THE.......? Some detail part, I guess, BUT, WASN'T about to allow it on the model (like a lot of times of other parts) to enhance its looks was in order!


I took it off the parts tree, and simply clipped it in half! It then got to take a ride on the Unimat Lathe, to have the ends where I cut it, trued (to be round) and made to fit within the inside diameter of a section of aluminum tubing, that was one end, on a larger diameter piece of aluminum. Then too and did the same to the other end, only difference between the 2 was that this end was made smaller, to fit inside of a smaller "telescopic" piece of aluminum tube, to be able to slide it into the larger one to span the distance from the transmission, to the pumpkin on the rear differential.

NOW a short quick lesson, they're made this way in real life. WHY? Well as the car is run, goes over differences in the road up or down hill, crosses a speed bump the rear axle moves, up and down, IF the drive shaft was one piece, and did not extend telescopically, It snap a U-joint! They have to extend and contract to work. SO, this gives making a model version a plus! You can use ANY motor, ANY transmission, and ANY rear differential, NO MATTER what distance apart, you can make the drive shaft fluctuate length to fit, ONCE thats done, add it, (largest end goes to the transmission) have the telescopic aluminum tube at its very shortest length, get it in place and then spread the telescopic tubing larger diameter to the transmission, smaller diameter tubing to the differential, then add a small tooth pick drop of CA to the drive shafts slip joint, allow to dry, and then paint, DO NOT add glue to the joints to the transmission, or the differential, WHY? Cuz, you can "spin" it and paint it in place, just as I will. Once paint is dry, you can then add a VERY SMALL drop of glue to both ends of the drive shaft!
More to follow! Stay tuned, and thanks for looking!
Hemi- I should be working on Models
- Number of posts : 320
Age : 46
Location : New Hampshire, USA
Registration date : 2016-10-12
Re: 1968 Plymouth Roadrunner COMPLETE 2-19-2017
![]() by Hemi Fri 10 Feb 2017, 8:39 am
by Hemi Fri 10 Feb 2017, 8:39 am


A few things here, 1, notice the engine is FINALLY in place, 2, the trannsmission is completely painted, AND has a distinct transmission "pan", 3, front "larger" diameter drive shaft section is in-place, BUT "setting" (its NOT glued!) UNPAINTED..... This is what I was speaking about a few posts ago. Then:

Smaller diameter drive shaft, in-place, now, once "spread" apart, and in place on each end to the transmission, and to the rear differential, a small drop of CA glue applied to the slip joint will hold it in place, but allow the whole "unit to spin freely, to paint ALL sides of it.

Painted, and glued solid in place! NOT to shabby!
Now that the engine is in place, A BUNCHA detailing is coming!
ENJOY, more to follow!
Hemi- I should be working on Models
- Number of posts : 320
Age : 46
Location : New Hampshire, USA
Registration date : 2016-10-12
Re: 1968 Plymouth Roadrunner COMPLETE 2-19-2017
![]() by Hemi Fri 10 Feb 2017, 8:39 am
by Hemi Fri 10 Feb 2017, 8:39 am


I had my work cut out for me, the whole engine has A LOT of wires going to and from it. Alternator wires, to the coil, and onto the surrounding places. I also got the windshield wiper "sprayer" tank, in place, painted one color as I had to go back and paint the cap. Then the little hose from it to the wipers themself in place with there rightful "mounts". I had decided to run the alternator wire (blue one) to the coil and then onto the firewall. The other wire from the alternator runs onto the inner fender well to the core support and across to the battery side and through it again. This then goes to the battery terminal. (NOT in place yet)
Master cylinder in place, and has its brake lines in place running to the valve manifold below (seen in other posts of the build) and yes........ they ARE connected!

Not that it should be here from the factory, BUT I couldn't get much more to go across the firewall with the way my hands are, so here is the battery wire from the alternator going through the radiator core support to run across it, to the other side, near the battery and through it again. -Left "loose" as it needs to go to the battery once in place, and then a second wire off that same battery terminal to the firewall electrical details.

More of a shot of that side of the engine compartment.

Battery painted, and in place, the wires spoken about in place on it as well.


Wiper sprayer tank with "cap" painted! A few other small details seen here too!

Alternator wire (black) seen with the horn wire (blue) running to the battery side of the car, to then go to there rightful places, (horn wire directly into the firewall)

Something to note here, the Alternator! It was a chrome part that I dipped into Dullcote to get that look, and once dry, applied "copper" color paint to the openings that a real one would have to show the copper wire "windings" in side seen through those openings, which are meant for cooling of it when running.
Engine compartment is now Complete, (I may go back and have a look at a detailing part thats just not quite right, BUT will see what I can do about it. Thanks guys!
Hemi- I should be working on Models
- Number of posts : 320
Age : 46
Location : New Hampshire, USA
Registration date : 2016-10-12
Re: 1968 Plymouth Roadrunner COMPLETE 2-19-2017
![]() by Hemi Fri 10 Feb 2017, 8:39 am
by Hemi Fri 10 Feb 2017, 8:39 am

I have to say now, I did NOT get good pictures of this as it was happening, so..... They are lacking in detail as I went along. BUT here you see, one in place, mounted and painted Testors steel. THEN across from it, you see a "gold-ish" colored pipe, that will have the same thing done to it for painting it steel. At the first frame cross-member off the engine you can see my exhaust pipe "joint" WITH a black hanger! I made ALL of the pipe work for the exhaust from aluminum wire. The only kit supplied part, is the mufflers!

Both pipes match......

A view to where they go and meet up with the engines exhaust manifolds. This was a fun task to get the pipe to fit each side differently, PLUS doing it, with the condition of my hands, (bending pliers is all I was able to use) where I would have used them, a vice, and all sorts of other shaping tools in my shop BUT I was unable to operate the rest of the tools correctly so the pliers is all I had to use, and was able to use somewhat comfortably.....
ALSO notice, the tires, rims are in place, both on the front AND the rear! I got them in place as well! The front tires were added with the spindles/axle mounts "steerable" so once the tires and rims were on, I could position them however I wanted..... PLUS, allowing them to steer helped aid me in getting the brake lines and fittings in place on either side if they had been "glued" it would not have been easy..... Not with my hands anyway, had my hands been in regular shape/condition, I wouldn't have had any issues with that.

Going out the back. I'll say here, the exhaust tips, will be THEE LAST part added, as the exhaust pipe has been left "long" for when the body goes onto the frame, and the pipes have been bent (if needed) down below the rear bumper. Till then, they will remain as you see them! Slightly long, for tweaking into place.

Frame up on all 4's...... Tires having "GOODYEAR" whited in with a white gel pen, (BOY was THAT a task) Doing the word "GOODYEAR" on 4 tires took me 3 DAYS! And on the frame they are, with the front steering turned, and all the brake lines in place on the front as well as the back. -I think it was all worth its effort I put into it!


Enjoy, More to come! This has been a difficult build due to my hands, BUT a fun one at the same time just to see what I was capable of doing, and NOT ruin, no matter how long any one thing took.... Why rush? All I had when I started, was, well..............time!
Thanks for looking!
Hemi- I should be working on Models
- Number of posts : 320
Age : 46
Location : New Hampshire, USA
Registration date : 2016-10-12
Re: 1968 Plymouth Roadrunner COMPLETE 2-19-2017
![]() by Hemi Fri 10 Feb 2017, 8:40 am
by Hemi Fri 10 Feb 2017, 8:40 am
ANYWAY, the part or area I haven't touched yet? The interior! Remember its a '68 Roadrunner, these cars had very little as far as options so...... The interior, is VERY plain!

Mostly, flat black with some highlights with semi-gloss black to stand out just a little. Seen here with different area's details painted silver chrome to justify the looks within the car!

Flat black over-all, BUT, the floor mats painted semi-gloss black to have a vinyl look to them and then the seats to reflect this as well, both front and back bench seats.

Better view to show the "sheen" differences on everything!

Plain jane dash...... REMEMBER, this car was to have a 426 Hemi in it, meaning it had a Mopar A833 transmission, as a standard 4 speed transmission. I had added the 383, with a 727 Automatic, SO, the pedals had to be changed to reflect this. Automatic, on the floor shifter was the idea.....
I haven't to date got a good picture of the completed interior, THAT will follow. (The ones I took did not turn out to be clear crisp pictures, SO......I have to get them yet to date!
SO, there will be one more posting to this build, showing the interior, AND I have yet to finish the engine (it needs its air cleaner still) BUT I'm working on that still.
ENJOY! Thanks for looking!
Hemi- I should be working on Models
- Number of posts : 320
Age : 46
Location : New Hampshire, USA
Registration date : 2016-10-12
Re: 1968 Plymouth Roadrunner COMPLETE 2-19-2017
![]() by Hemi Fri 10 Feb 2017, 8:40 am
by Hemi Fri 10 Feb 2017, 8:40 am
Anyway, at one point, I got out my spray can of Primer, and did a wet sanding on BARE plastic, to get any mold lines gone and smooth the whole thing to take primer nicely, which it did! So, heres that!

One side, then the other:

In the last picture it got wet sanded one more time with 1500 grit wet/dry, and then I got that last picture, it had to then sit and dry for further inspection.
Short update, BUT more to follow! Thanks for looking.... ENJOY!
Hemi- I should be working on Models
- Number of posts : 320
Age : 46
Location : New Hampshire, USA
Registration date : 2016-10-12
Re: 1968 Plymouth Roadrunner COMPLETE 2-19-2017
![]() by Hemi Fri 10 Feb 2017, 8:40 am
by Hemi Fri 10 Feb 2017, 8:40 am
Having said that, What did I have sitting there, waiting? OHHHH yeah, my '68 Roadrunner. so out came the paint, Lacquer thinner and some stirring sticks to mix/thin the paint for spraying through my Air Brush! Heres the 1st coat of color....

Let it dry for 48 hours.... then gave it another wet sanding with 1500 grit paper.....
2nd coat of color:

Let it set again for 48 hours, and gave it a final wet sanding of 1500 grit..... Let it dry, and gave it a 3rd coat of color:

Painted just like a real car would be. Each coat is VERY THIN, and VERY light, to not cover up any detail, BUT build up the paint to be "worked" and smoothed out.
At this point, I think one more nice "wet" coat of paint, and a light wet sanding with 1800 to 2000 grit will be great, and then I can move on to the first coat of clear coat.
More to come as time allows! Thanks for looking! ENJOY!
Hemi- I should be working on Models
- Number of posts : 320
Age : 46
Location : New Hampshire, USA
Registration date : 2016-10-12
Re: 1968 Plymouth Roadrunner COMPLETE 2-19-2017
![]() by Hemi Fri 10 Feb 2017, 8:41 am
by Hemi Fri 10 Feb 2017, 8:41 am
There really isn't much left ot do on this one, but me being me, I was stuck on a decal needed for the hoods edge, as well as the trunks edge! And I refused to go on without those decals! NOW however, I got those needed decals! So onto finishing this one we go.....
All this model needs to be completed, is the decals (as I mentioned) and clear coated over them and then the BMF added to the windows, and then final assembly! I also have some grille work to do (blackening) so.... BUT that shouldn't be too bad to do! SO, to get moving to the finish line, I got the "black" over the hood, as planned!


That looks KILLER! The red is polished right down ready for gloss clear coat!!!! The black was sprayed on "flat" and will be gloss coated with the rest of the hood! I think this is gonna look KILLER when done!


The underside.... I have to add the hood insulation, and then I THINK that line in the front of the hood that goes all the way across, is to be a rubber "seal-like" thing that makes contact with the real cars radiator core support..... (I for the life of me, can not remember what thats called!) BUT that needs painted black... as its a rubber-like stripe! I'm not going to worry about the line for cutting a hole in the hood on this one, As I'm gonna be adding some other details in here that are for "fresh-air" duct-work.... Should cover most, if not all of that recess.....
A little work but not impossible to do by the years end! (I'll be working on this one New Years Eve if I have too!)
Enjoy, more will come as I get things done! Thanks for looking, Comments always welcome ~Enjoy
Hemi- I should be working on Models
- Number of posts : 320
Age : 46
Location : New Hampshire, USA
Registration date : 2016-10-12
Re: 1968 Plymouth Roadrunner COMPLETE 2-19-2017
![]() by Hemi Fri 10 Feb 2017, 8:41 am
by Hemi Fri 10 Feb 2017, 8:41 am
So with that, I revamped the Wiper motor, with a new "found" part within the kit, and then added the "Beep, Beep" horn, painted correctly & wired in, so I'm getting there! I also painted and got the decal on the air cleaner as well, (Waiting for that to dry to add another coat of decal set to that to make the decal "lay out flat"...

Shows no "Beep, Beep" horn in-place....

NEW chrome part found within kit, for the Wiper Motor.... Installed, NOT "wired" in yet!

Wiper Motor installed, chrome is dullcoated to look like Aluminum, motor in the housing painted Gloss Black, and wired in with the little blue wire that went to the last one!

A little better detail shots of the Wiper Motor details....


"Beep, Beep" Horn in-place, and wired in.... Looking really good!!!!! -I'm pretty pleased with how the under-hood details has turned out on this model! I'm actually excited to get this one done, as it will be the first Plymouth I've finished in decades!!!! LITERALLY!
And then last but not least for now:

The grille has all is black shadowing, and lens. I did the normal with the black shadowing work, and the lens, I made from Testors clear glass glue that doesn't "smear" just dropped into place and left to "pool" up and look like a lens right over the locations on the grille, (MIGHT get a second "Coat", not sure yet!)
Thats it for now everyone, thanks for following along and looking, as always comments welcome and enjoyed! -HAPPY NEW YEAR!
Hemi- I should be working on Models
- Number of posts : 320
Age : 46
Location : New Hampshire, USA
Registration date : 2016-10-12
Re: 1968 Plymouth Roadrunner COMPLETE 2-19-2017
![]() by Hemi Fri 10 Feb 2017, 8:42 am
by Hemi Fri 10 Feb 2017, 8:42 am
I took the hood and being a "Stock" kinda guy, I wanted the Roadrunner to have its under-hood insulation for vibration and sound as well as heat. (MOST Roadrunners this was either not ordered with the car, OR had been removed from the car (to lighten the car for racing), or in some cases later in years fell out and was never replaced. Anyway, in either of those scenarios, I choose to add it, like the car should have had from new, BUT could be ordered without, OR simply put, My car was the "basic" Family Guy cheap "muscle car".... SO then I added this to the underside of the car!

In that pic you'll see that I semi-filled in that recess for the hood to be cust for a hole and engine parts to come through, OR a BIG center mounted hood scoop to be placed! I filled that recess in and painted to what it matched to be on the hood, to attempt to hide it. Not as good as it could be, but being as far a long in the build and work on the hood that I was, I wasn't going back and literally "FILL IN" that areas with putty, or glue and baking soda, SO I just made a "band" filler pressed into place and CA glued along its edges! Once dry, painted to match the mating surfaces it touches.


Seen in the last pic is that sealer strip that on the 1:1 would "seal" the engine compartment to the top of the Radiator Core Support, painted flat black, to look like a rubber seal! For what it is, (I'm not exactly 100% happy with the recess job, BUT I can live with it how it is! SO, I'm good and this is how its gonna stay! (I AM NOT, however adding the "Ramcharger", for lack of that same things name by Plymouth) As my Roadrunner got the 383 4 barrel and NOT the Hemi, and besides the '68's the "Power Bulges" on the hood did NOT "operate" and would not till I believe 1969, till they were replaced in late year refinements to the "Air Grabber" seen mostly on the 1970 Roadrunner!
Stay tuned, more to follow!
Hemi- I should be working on Models
- Number of posts : 320
Age : 46
Location : New Hampshire, USA
Registration date : 2016-10-12
Re: 1968 Plymouth Roadrunner COMPLETE 2-19-2017
![]() by Hemi Fri 10 Feb 2017, 8:42 am
by Hemi Fri 10 Feb 2017, 8:42 am
Sadly, I found "test fitting" or well "dry fitting" the plate, on the back was "OK" but the front one, well there was no real way to put it, as a "decal" and that lead me to make my own license plate "backing plates" to add the decal too.... Just thin .020 of an inch thick sheet styrene cut to fit the decal and fitted to fit the location. (the front area is more narrow side-to-side then the rear bumper area is! SO to have to be careful on its assembly and all with that. So there is a "front" and a "rear" plate once on the backing plates! And me being, well me, I can't just cut the decal out out and white glue it to the bumpers, they have to become literal parts of the car, (I don't like parts falling off my models over time even being protected!)

The license plates look really good! I'm pleased with how that all turned out!

Then I've went and gone to painting in the Turn Signals in the front bumper. That looks great over the chrome! This little extra looks great too! -I will be taking a soft Q-Tip to lightly polish the chrome once the bumpers are on the car! I left a few finger prints on it, NOTY paint, and not glue.... So should easily wipe off.
Then, the last thing I worked on was the tail lights! They needed a little work, and still need a little bit. BUT I got the taillight red painted over the Chrome, as well as the flat black shadowing it needed!

I have a little more to "clean-up" on it as the flat black needs to have a little removed from the chrome trim lip between the red lens and the black shadowing. I see some more black that needs removed! But, it looks good for what more needs done!
Thats all I've gotten done on this kit, (I'm getting ready) to begin painting the gloss clear coat on the Hood! Stay tuned for those following along this build, I'll be posting pics of the body as soon soon as I can "handle it" from being clear coated!
Thanks for following along! Comments always welcome & encouraged! ~ENJOY
Hemi- I should be working on Models
- Number of posts : 320
Age : 46
Location : New Hampshire, USA
Registration date : 2016-10-12
Re: 1968 Plymouth Roadrunner COMPLETE 2-19-2017
![]() by Hemi Fri 10 Feb 2017, 8:42 am
by Hemi Fri 10 Feb 2017, 8:42 am
The one thing I had waited on in finishing was the Air Cleaner... -I did not get the "proper" air cleaner decal, BUT I did get something close and I THINK I added just enough "Roadrunner" to it to make it "passable"! Thats not to say I won't go back later on and give it the correct "pie-tin" decal, if I get one, as I made the air cleaner removable from the model! (I do that on almost all of my builds!) But, if not I'm good with how its currently done too!

I made that air cleaner too! From what I have had and those I've used as well as knowing whats all out there for "stock" air cleaners for a 383 Roadrunner engine, nothing was even close to the actual part in looks! SO, it was turned on my Unimat lathe, with all the proper contours (or VERY close to), and made a tad bit "higher" as they were on the 383 Roadrunner engines, and then got painted as close as I could get it to be to resemble that of the real thing. Then once dry, The Pie-Tin area got gloss coated to seal on the decals, and the air cleaner itself got flat "dullcoted", as per the real thing, or what I've seen and remember seeing in the garage. The only "detail" left under the hood now is the PCV hose from the valve in the valve cover, to the air cleaner. Thats yet to come!
This is all I've gotten done on this build but there WILL be some more to follow! As I need to get the hood and the body in the spray booth for hopefully the last coat of gloss Lacquer Clear Coat!
Thats all for now folks! More will come as I get closer to the finish line! Comments always welcome too, ~ENJOY
Hemi- I should be working on Models
- Number of posts : 320
Age : 46
Location : New Hampshire, USA
Registration date : 2016-10-12
Re: 1968 Plymouth Roadrunner COMPLETE 2-19-2017
![]() by Hemi Fri 10 Feb 2017, 8:43 am
by Hemi Fri 10 Feb 2017, 8:43 am


All these taken WITH my shops general overhead lighting as well as my work bench lighting AND my Camera flash!
Then you got these:


These were taken with no camera flash but the use of my bench lighting and overhead lighting!

NO camera flash, no bench lighting, and only overhead lighting!
I'm absolutely AMAZED at that finish! It looks GREAT! So with that, I got right to adding chrome parts....

The grille is in-place and there to stay! The BMF is coming tho! 8D
Thanks for looking & following along on yet another build of mine! This one is SO CLOSE done! Stay tuned! Comments welcome and encouraged! ~ENJOY!
Hemi- I should be working on Models
- Number of posts : 320
Age : 46
Location : New Hampshire, USA
Registration date : 2016-10-12
Re: 1968 Plymouth Roadrunner COMPLETE 2-19-2017
![]() by Hemi Fri 10 Feb 2017, 8:43 am
by Hemi Fri 10 Feb 2017, 8:43 am

Seen here is one thats "stuck" to tape made to hold the lens while I went and bent up the wire to fit the outer edges of the lens and be polished at the same time! The other lens thats still ON the sprue is the factory look, thats been painted! I added that trim ring on the other one thats NOT on the sprue!

A little better in-depth look....
Then you have the wire as its being bent and shaped to the lens circumference!


A LOT of compound bends to make that fit that factory kit lens part! And polished up nice too! WHY does it polish up nice? Well thats a secret to be said now, that "wire" I used? isn't "wire" at all! Thats 100% Pure Jewelers Silver Solder! -Expensive? yeah just a little, I bought it for when I was building trains and needed it to seal up bearings and polish things smoothly to have a bit of a gleaming smooth surface as those bearings require a little different approach to the making of them when made of brass, and well, silver is easily workable the other way is nickel plating and I didn't want to have to send the parts out to someone else, so I did everything in-house, its not often I use the silver solder specially on a model car or truck, but its not a lot that I used here and to that, nothing else was correct in diameter to match up to the other chrome trim within that tail light lens! SO.... I think it looks GREAT and it bends and forms a lot easier then actual wire and looks good all at the same time! It was "fastened" to the lens much the same way I did black wire trim rings on another model headlights.... With that clear glass glue from Testors, applied a really thin line of glue where the ring would make contact, and then once dry, around the outer edges and added some more, let dry, and then sealed that in with brush on gloss coat lacquer.... -LOOKS great too!
So while I was doing this, I was conjuring up the gut fortitude to go on with the BMF work too! *GULP* I still question that task with me.... Stay tuned, thats to follow! Thanks for following along and as always, Comments & Commentary welcome!
Hemi- I should be working on Models
- Number of posts : 320
Age : 46
Location : New Hampshire, USA
Registration date : 2016-10-12
Re: 1968 Plymouth Roadrunner COMPLETE 2-19-2017
![]() by Hemi Fri 10 Feb 2017, 8:43 am
by Hemi Fri 10 Feb 2017, 8:43 am


I also forgot about going around the windshield wiper arms too! That was an interesting task, as well, but wasn't as difficult as I first anticipated! -Did those first, and then went on to do the trim around the windshield.... Turned out pretty good! I'm actually pleased with my efforts here and work! (I keep it up I'll have a better outlook at my BMF skills I keep this up!

...And about the time I had a little more confidence, I was slapped, hard in the face, with a side "wing vent window trim" man does those SUCK! LOL I musta pulled the BMF off the drivers side 3 times BEFORE I was happy with it! (I hate wasting materials) but I simply could NOT live with how it looked either! And I found that the MPC cars, have an issue not noticed back when I actually "painted" the chrome onto the model, the windshield pillars, in the front, where the windshield meets the side vent wing windows, don't always have a "line" for the chrome trim on the pillar itself! SO as a modeler you sort of have to create it as you put the BMF on..... Making sure its semi even and straight..... As its so close to the windshield trim that off by the thickness of your blade can and will be seen! Damn, is that a difficult one to do and look right! -THEN I get to do that rear window! OMG....


WOW........ I'm am amazed at myself! Really, I'm so surprised how that window chrome went on, went down, and trimmed off.... I'm pleased with that and how it looks! I sat and stared at that work for at least 2 minutes in absolute amazement! LOL
Then while doing trim, I ran into something that I was working on a whole other model... (one thats in my "Round Robin" build here, BUT, sat aside, the '68 Dodge Dart.... There is ONE detail this Roadrunner does NOT have on it, or with it as a detail part, thats partly "trim" and is chrome or well part of it is chrome and then rest is just metal..... Anyone know what that "detail part" might be?
With that, I'll give you all a picture! -Have a look, and take a wild guess what it is, and post it.... I'll then reveal what I've made!

NOT that handle of a file in the right side of the picture, that little "triangular" part, what you all think that is?
Enjoy for now look forwards in responses to that little part!
Hemi- I should be working on Models
- Number of posts : 320
Age : 46
Location : New Hampshire, USA
Registration date : 2016-10-12
Re: 1968 Plymouth Roadrunner COMPLETE 2-19-2017
![]() by doorslammerfan Fri 10 Feb 2017, 10:22 am
by doorslammerfan Fri 10 Feb 2017, 10:22 am
Anyways again well done, keep it up


doorslammerfan- AMCC ADDICT

- Number of posts : 2290
Age : 55
Location : Te Awamutu ,New Zealand
Registration date : 2009-08-14 -

Re: 1968 Plymouth Roadrunner COMPLETE 2-19-2017
![]() by Hemi Fri 10 Feb 2017, 3:38 pm
by Hemi Fri 10 Feb 2017, 3:38 pm
And yes, your right that is a Aerial "base" to mount one on the fender! -That whole detail right now is completed and on the body, I have yet to get pics of it!
Hemi- I should be working on Models
- Number of posts : 320
Age : 46
Location : New Hampshire, USA
Registration date : 2016-10-12
Re: 1968 Plymouth Roadrunner COMPLETE 2-19-2017
![]() by Hemi Mon 13 Feb 2017, 11:33 am
by Hemi Mon 13 Feb 2017, 11:33 am
So then, my last posting I left up-in-the-air on the little Aluminum turning I made, and Jeff, (AKA: dge467) guessed it right, that part is in fact a Antenna base! And heres how it all went together!

As I mentioned, I "locate" the part, as close as I can (from pictures of the real thing if need be!) and then drill a hole just big enough that a long CHROME straight pin is a "loose press fit" through it from underneath. This way the head of said straight pin is part of the "mount" to hold it in-place! I hold the pin straight side-to-side & front-to-back, and super glue from underneath as well. Once that dries (pretty quick) I slip the polished aluminum base over the pointed end of the the straight pin and leave it just above the body. I then take a small amount of super glue onto a toothpick BARELY touch the pin close to the body of the car, to leave a small amount and then while "wet" (you have to act quick here) push the polished aluminum base down till it touches the body of the car having the super glue get inside the base to hold it in-place! Looking at the picture, it looks really good!

Looks just a tad "heavy barreled" but is WAY better then ANYTHING a model part could be..... Ain't nothing "round" about a molded model part Antenna!

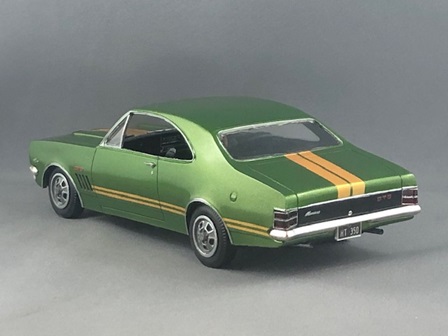
So I turn on the lights..... Now thats BRIGHT! and that Antenna looks GREAT!
From the other side? Yeah, why not!?

Looks good! I'm so pleased with this whole model I can't even say. I've surprised myself several times during its build and its coming to a close shortly as there really isn't much left to do till its done, and that I hope to have done TODAY! All snow'd in, and more falling as I type this so. I can't see it any other way at this point!
Then, speaking of lights...............remember those tail lights I was working on? What you guys think of them? Have a look:

I thin it could have been a little better, BUT I worked with what I had in-hand and for that reason I think its pretty good! I'm pleased with that! -Thats why they're in-place!
Stay tuned more to follow right after these short messages! Thanks for following along, and Commentary is always welcome!
Hemi- I should be working on Models
- Number of posts : 320
Age : 46
Location : New Hampshire, USA
Registration date : 2016-10-12
Page 1 of 2 • 1, 2 ![]()
» 68 plymouth roadrunner update 10/01/16
» 1968 Plymouth Road Runner
» 68 plymouth roadrunner
» 68 Plymouth roadrunner hemi