'66 El Camino Tank
+18
baZOOKa
ShawnS
Tubman
Paul
Kane
doorslammerfan
DeeCee
Rigby3003
zenrat
Unforgiven
VWMan
Shoey
aussie muscle
tezza43
Adam Clark
blatdriver
allan
Clutch
22 posters
Page 2 of 2
Page 2 of 2 •  1, 2
1, 2
 Re: '66 El Camino Tank
That interior just blows my socks off (The rest of the model took care of the shoes)
Excellent use of old IC's and miniature SMD's its given me food for thought.
Take a bow sir ...excellent work !
Excellent use of old IC's and miniature SMD's its given me food for thought.
Take a bow sir ...excellent work !
 Re: '66 El Camino Tank
This is AWSOME 


Deadly- I Love this place

-
 Number of posts : 543
Age : 54
Location : Calliope Qld
Registration date : 2010-01-19
 Re: '66 El Camino Tank
That interior detail is mind blowing mate.Great use of old electronic parts, i've used resistors as fuel filters and pumps, but, this is REALLLLLY thinking, VERY well done mate. 


DeeCee- AMCC ADDICT

-
 Number of posts : 3772
Age : 58
Location : Launceston Tas
Registration date : 2011-08-07
 Re: '66 El Camino Tank
Cheers guys.

Shawn, dude, you're the crazy one. You're building a car from flat sheet!!!
@ Bazooka

Progress, Back working on the body.
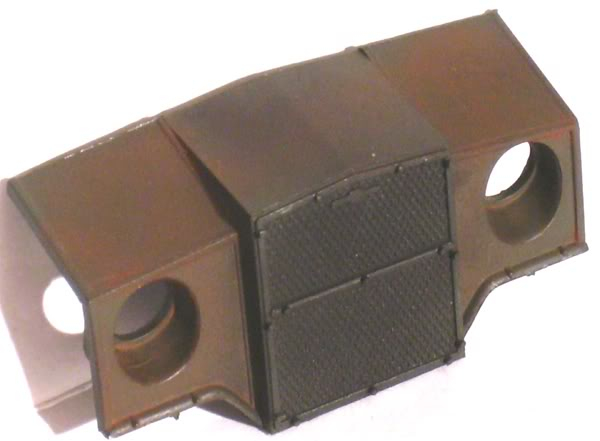
I found a few different ways to make your own weld lines by researching some of the military forums. I mixed two-part putty together and rolled it into a ball. Using a ruler (length ways) I rolled that ball into a long noodle about 1mm in width. I took a piece of 1.5mm rod and angle cut the tip. Using that tip, I pushed into the noodle creating marks. Before the putty set solid, I peeled the weld off with a knife.

Then glued the welds in place.

Light coat of silver just to see how they look. I think the welds look a little too wide but oh well, next time I guess.

I'm going to camo paint the build, but I want it to look scratched and a bit rusty. These next steps are just the undercoat and the camo paint job will go on top.
First is the rust coat. Dull brown with dull red on the top portion and a mist of light sand.

Have you heard of the hairspray trick? Spray hairspray over top the base colour, then spray a second colour overtop the hairspray. Next scrub the body with a toothbrush under warm water. This creates a chipped, scratched surface. The hairspray doesn't totally harden and with a srcub, you can lightly expose the bottom colour.
So that's what I did, sprayed hairspray overtop the brown/red and then I sprayed a mix of grays and some white.


Then I proceeded to scrub with a toothbrush but it wasn't really working. I think I let the hairspray dry too much. In the end, I scrubbed it with brake fluid. I have to repair some areas as some of the welds fell off.
As I said, this is just the undercoat, on top of this will be a warn out camo paint job.


Don't worry about me bro....all is goodTubman wrote:Yeah, really starting to worry about you brother

Shawn, dude, you're the crazy one. You're building a car from flat sheet!!!
@ Bazooka

Progress, Back working on the body.
I found a few different ways to make your own weld lines by researching some of the military forums. I mixed two-part putty together and rolled it into a ball. Using a ruler (length ways) I rolled that ball into a long noodle about 1mm in width. I took a piece of 1.5mm rod and angle cut the tip. Using that tip, I pushed into the noodle creating marks. Before the putty set solid, I peeled the weld off with a knife.

Then glued the welds in place.

Light coat of silver just to see how they look. I think the welds look a little too wide but oh well, next time I guess.

I'm going to camo paint the build, but I want it to look scratched and a bit rusty. These next steps are just the undercoat and the camo paint job will go on top.
First is the rust coat. Dull brown with dull red on the top portion and a mist of light sand.

Have you heard of the hairspray trick? Spray hairspray over top the base colour, then spray a second colour overtop the hairspray. Next scrub the body with a toothbrush under warm water. This creates a chipped, scratched surface. The hairspray doesn't totally harden and with a srcub, you can lightly expose the bottom colour.
So that's what I did, sprayed hairspray overtop the brown/red and then I sprayed a mix of grays and some white.


Then I proceeded to scrub with a toothbrush but it wasn't really working. I think I let the hairspray dry too much. In the end, I scrubbed it with brake fluid. I have to repair some areas as some of the welds fell off.
As I said, this is just the undercoat, on top of this will be a warn out camo paint job.


Clutch- Legend Poster

-
 Number of posts : 1310
Age : 48
Location : Bargara Qld
Registration date : 2009-04-21
 Re: '66 El Camino Tank
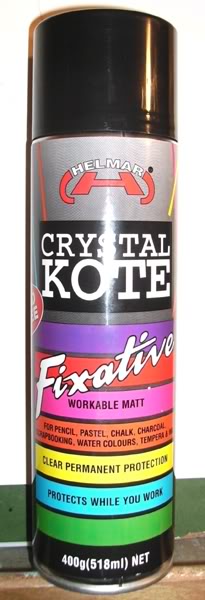
tip for you look at using hard dry pastels to add a bit of weathering,you can pick them up cheap,you can use old knife to scrap pastel to dust or very ruff sand paper,you bush on with stiff bristle paint brush also can mix a few small drops of water making a thin paint with the pastel powder,the fix it in place with spray fix it,its come in large rattle can from art shops its used to seal pastel to paper you don't need much just a fine dust coat and you can add more powder if you need to.If you put to much pastel powder on it washs off with water.

allan- AMCC ADDICT

-
 Number of posts : 10406
Age : 67
Location : East Maitland
Registration date : 2008-03-31
 Re: '66 El Camino Tank
This was weathered with pastel powder,first it was paint flat dark green them mix of pastel powder and sealed with fix it.there are other brands of fit it on the market too.


allan- AMCC ADDICT

-
 Number of posts : 10406
Age : 67
Location : East Maitland
Registration date : 2008-03-31
 Re: '66 El Camino Tank
G'day guys,
Been awhile since My last update, new job doesn't give me much time on the computer anymore. Still building, just not updating. Get ready for 6 weeks of pics!
Thanks for the weathering tip Allan, I remember you telling me about the powders ages ago. I'll give the powders a go one day but on this build I want to use the salt method. Thanks anyways.
Progress;
Took a page straight from Shoey's book. Hope you don't mind mate but I've used your motorized mini gun idea. When I seen those guns on your Death Race Mustang, I knew I wanted to try it. We could have a shoot out

The motor on the bottom is from a mobile phone (makes phone vibrate) and the top one is from a toy. I used the smaller one.
Detailed the motor to look like a gun and made a wheel cover as it's base.


Brass barrels and styrene tube for the rings. Threaded rod and a nut from a toy skateboard holds it in place.


Connected to the phone battery.
Spins super fast!


Because of the threaded mount, the gun can rotate backwards.


Also added night vision headlights.


The antenna is the switch. Down/on, up/off.


Headlight brush guards.

Pivoting missiles on the other side.


Salted the turret.


Added some Tamiya powders.

Made some camo stencils.

Layed down some salt on the red/grey undercoat, then using about 8 camo stencils, I did the camo paint job.

Washed off the salt.

Dusted everything with Tamiya weathering kits.


Sorry about the 6 weeks worth of pics, least you get to see it all at once!
Been awhile since My last update, new job doesn't give me much time on the computer anymore. Still building, just not updating. Get ready for 6 weeks of pics!
Thanks for the weathering tip Allan, I remember you telling me about the powders ages ago. I'll give the powders a go one day but on this build I want to use the salt method. Thanks anyways.
Progress;
Took a page straight from Shoey's book. Hope you don't mind mate but I've used your motorized mini gun idea. When I seen those guns on your Death Race Mustang, I knew I wanted to try it. We could have a shoot out


The motor on the bottom is from a mobile phone (makes phone vibrate) and the top one is from a toy. I used the smaller one.
Detailed the motor to look like a gun and made a wheel cover as it's base.


Brass barrels and styrene tube for the rings. Threaded rod and a nut from a toy skateboard holds it in place.


Connected to the phone battery.
Spins super fast!


Because of the threaded mount, the gun can rotate backwards.


Also added night vision headlights.


The antenna is the switch. Down/on, up/off.


Headlight brush guards.

Pivoting missiles on the other side.


Salted the turret.


Added some Tamiya powders.

Made some camo stencils.

Layed down some salt on the red/grey undercoat, then using about 8 camo stencils, I did the camo paint job.

Washed off the salt.

Dusted everything with Tamiya weathering kits.


Sorry about the 6 weeks worth of pics, least you get to see it all at once!

Clutch- Legend Poster

-
 Number of posts : 1310
Age : 48
Location : Bargara Qld
Registration date : 2009-04-21
 Re: '66 El Camino Tank
They need a *holy freaking crap* emoticon, because I would use it 10 times on this model.
Outstanding work mate Would definately not want to run into it in a war.
Once again Outstanding
Outstanding work mate Would definately not want to run into it in a war.
Once again Outstanding

Adam Clark- Legend Poster

-
 Number of posts : 1063
Age : 27
Location : Launceston
Registration date : 2011-07-11
 Re: '66 El Camino Tank
I agree , there aren't enough words availible to describe what you've done here , well done .

sports850- Legend Poster

-
 Number of posts : 1065
Age : 53
Location : Red Rock NSW
Registration date : 2009-08-07

zenrat- Moderator
-
 Number of posts : 6842
Age : 56
Location : Dank Northern slopes of Mount Martha, Vic
Registration date : 2008-07-17
 Re: '66 El Camino Tank
 that's one wild and wicked ute

allan- AMCC ADDICT

-
 Number of posts : 10406
Age : 67
Location : East Maitland
Registration date : 2008-03-31
 Re: '66 El Camino Tank
 The ideas you have come up with in this build are increadible mate, every thing looks like it would work for real, and some of it actually does!! Shear BS, very very well done.


DeeCee- AMCC ADDICT

-
 Number of posts : 3772
Age : 58
Location : Launceston Tas
Registration date : 2011-08-07
 Re: '66 El Camino Tank
INSANE!

Unforgiven- I should be working on Models

- Number of posts : 441
Registration date : 2009-02-25
 Re: '66 El Camino Tank
Thanks very much guys  I've had a lot of fun building this thing. Trying to make something that isn't real, look real and not having to worry about shiny paint has been a bonus too!
The interior is done. Printed some radar images on paper.
Driver is on the right and co-pilot on the left.

Photo below, co-pilot seat is lower than the drivers. This gives the driver a full 360 view, allowing him to look overtop the co-pilots head.

The driver has only 2 monitors, cause he needs to keep his eyes on the road. The co-pilot has alot more going on.


Nearly finished, the wiring is a bit dodgy, need to fix that.
Thanks for looking
The interior is done. Printed some radar images on paper.
Driver is on the right and co-pilot on the left.

Photo below, co-pilot seat is lower than the drivers. This gives the driver a full 360 view, allowing him to look overtop the co-pilots head.

The driver has only 2 monitors, cause he needs to keep his eyes on the road. The co-pilot has alot more going on.


Nearly finished, the wiring is a bit dodgy, need to fix that.
Thanks for looking

Clutch- Legend Poster

-
 Number of posts : 1310
Age : 48
Location : Bargara Qld
Registration date : 2009-04-21
 Re: '66 El Camino Tank
This is ABSOLUTELY, AWSOMELY, INSANELY, BRILLIANTLY different 


Deadly- I Love this place

-
 Number of posts : 543
Age : 54
Location : Calliope Qld
Registration date : 2010-01-19
 Re: '66 El Camino Tank
WOW! Fantastic stuff Dude! Thats just how I would have done it. I reckon this has to be at our next show in Rocky!
I feel great that you have used the moble phone motor idea.
it shows that I am a little bit helpful here. Cheers
I feel great that you have used the moble phone motor idea.
it shows that I am a little bit helpful here. Cheers
 Re: '66 El Camino Tank
Amazing, simply amazing, so many cool ideas and superb scratchbuilding skills on display in one build !
Cheers, D
Cheers, D
Rigby3003- AMCC NEWBIE!

-
 Number of posts : 24
Age : 57
Location : Victoria
Registration date : 2011-08-21
 Re: '66 El Camino Tank


 ...words cannot express how cool this is! Great work.
mgy125- AMCC ADDICT

-
 Number of posts : 1679
Age : 88
Location : Moldovia
Registration date : 2010-06-24
 Re: '66 El Camino Tank
This now looks like a movie stunt car for "Death Race 2020". Very clever and well built. Good to see something so different now and again.


tezza43- AMCC ADDICT

-
 Number of posts : 4318
Age : 81
Location : Mornington, Victoria
Registration date : 2008-03-21
 Re: '66 El Camino Tank
You Sir are one sick F*cker. Unreal mate, once again something I would never build but like all your builds, you have amazing vision. Only one problem, you've given Shoey a bloody head swell, you know we'll never hear the end of it now 

Tubman- AMCC ADDICT

-
 Number of posts : 2050
Age : 60
Location : Gold Coast, Queensland, Australia
Registration date : 2008-10-13
 Re: '66 El Camino Tank
mwahahaha you might wanna look out mate i have a secret weapon on the work bench at the moment and come next years show its on like donkey kong!!!! chicka chicka wow wow, this is the awesomest most totally nuttiest build ever man im glad i saw this beast up close and personal at this years show, its an absoloooote weapon of a build up, very inventive i like it!!!!!

Nighthoon- I should be working on Models

-
 Number of posts : 484
Age : 36
Location : Cranbourne East Melbourne
Registration date : 2010-02-27
Page 2 of 2 •  1, 2
1, 2
Page 2 of 2
Permissions in this forum:
You cannot reply to topics in this forum
 dude that is awesome