1/8th Pocher T50 Bugatti build part 2
+4
tezza43
TomA
Paul
modelmaker
8 posters
Page 1 of 1

1/8th Pocher T50 Bugatti build part 2
![]() by modelmaker Sun 04 Oct 2009, 2:52 pm
by modelmaker Sun 04 Oct 2009, 2:52 pm
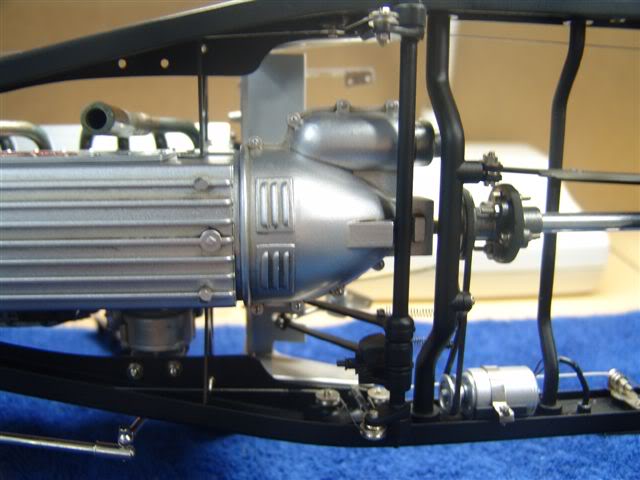
Since the last update I have made and installed the radiator , fuel tank and spare wheels I've also installed the brake cables and made the fire wall which I've also installed.
But I'd like to go into a bit more detail of how I put these assemblies together for "ModelArt" and because all to often we all see some very nice modifications made to a kit part or even a full scratchbuilt part that gets made, but no text given on how the part was made!
With the Brake cables They can be made to function by gently pressing the pedal but alot of extra work is required in order to get it to that point of operation.
I have used some very fine jewlers braiding wire which I stripped of it's plastic coating instead of using the kit supplied white colored string, I did this for two reasons pacticallity and eye appeal!
To join the linkage ends I cut some very fine K&S brass Tubing and resistance soldered them in place which gives a good locked in join.
I have also made and attached the fire wall pretty much as per the kit instuctions but I have avoided using the slotted drive self tapping screws that pocher supply and replaced them with 12BA Hex head bolts and nuts in the areas that will be visable on the finished model.
(Note to anyone who may be building one of these models or any Pocher for the first time, do not force the screws into their respective holes) it's strictly 1 turn in and one turn out.
I have also detailed the fire wall with .02mm Aluminium which has had a hand scraped pattern applied to the surface , I did this so as to better replicate the real cars firewall which gives a very accurate effect when installed.
To apply the pattern I used my Baby Proxxon mill for this job and turned down a piece of wood to 4mm in diameter put this piece into my mill and very gently lowered the spinning piece onto the aluminium until a scroll mark is made, this process is continued until the entire surface has been covered. The finished piece was given a clear coat of acrylic.
I should also say that to achive this type of finish you don't need expensive tooling , a hand held dremmel and fine wire wheel will also acheive the same finish.

fuel tank fitted as per kit instuctions
general view of underside looks busy and still not finished

Braided brake cable attached with K&S Tube and resistance soldered

overall top view

view of built gearbox housing and pedal arrangment

Brake cable arrangment and exhaust heat staining

hand scrapped firewall

Induction side of motor showing the supercharger which still needs butterflies attached

another view of functional pedal arrangement

same view with interior floor attached

Sean
But I'd like to go into a bit more detail of how I put these assemblies together for "ModelArt" and because all to often we all see some very nice modifications made to a kit part or even a full scratchbuilt part that gets made, but no text given on how the part was made!
With the Brake cables They can be made to function by gently pressing the pedal but alot of extra work is required in order to get it to that point of operation.
I have used some very fine jewlers braiding wire which I stripped of it's plastic coating instead of using the kit supplied white colored string, I did this for two reasons pacticallity and eye appeal!
To join the linkage ends I cut some very fine K&S brass Tubing and resistance soldered them in place which gives a good locked in join.
I have also made and attached the fire wall pretty much as per the kit instuctions but I have avoided using the slotted drive self tapping screws that pocher supply and replaced them with 12BA Hex head bolts and nuts in the areas that will be visable on the finished model.
(Note to anyone who may be building one of these models or any Pocher for the first time, do not force the screws into their respective holes) it's strictly 1 turn in and one turn out.
I have also detailed the fire wall with .02mm Aluminium which has had a hand scraped pattern applied to the surface , I did this so as to better replicate the real cars firewall which gives a very accurate effect when installed.
To apply the pattern I used my Baby Proxxon mill for this job and turned down a piece of wood to 4mm in diameter put this piece into my mill and very gently lowered the spinning piece onto the aluminium until a scroll mark is made, this process is continued until the entire surface has been covered. The finished piece was given a clear coat of acrylic.
I should also say that to achive this type of finish you don't need expensive tooling , a hand held dremmel and fine wire wheel will also acheive the same finish.
fuel tank fitted as per kit instuctions
general view of underside looks busy and still not finished
Braided brake cable attached with K&S Tube and resistance soldered
overall top view
view of built gearbox housing and pedal arrangment
Brake cable arrangment and exhaust heat staining
hand scrapped firewall
Induction side of motor showing the supercharger which still needs butterflies attached
another view of functional pedal arrangement
same view with interior floor attached
Sean
Last edited by modelmaker on Mon 05 Oct 2009, 6:54 am; edited 2 times in total
modelmaker- I should be working on Models

-
 Number of posts : 119
Age : 55
Location : Mildura Victoria
Registration date : 2008-03-28 -


Paul- AMCC ADDICT

- Number of posts : 4564
Age : 48
Location : Melbourne
Registration date : 2008-03-19
Re: 1/8th Pocher T50 Bugatti build part 2
![]() by TomA Sun 04 Oct 2009, 4:53 pm
by TomA Sun 04 Oct 2009, 4:53 pm
Nice one! Lots of fiddly work going on there. 

TomA- I should be working on Models
- Number of posts : 356
Age : 69
Location : Melbourne, Australia
Registration date : 2009-04-19
Re: 1/8th Pocher T50 Bugatti build part 2
![]() by tezza43 Sun 04 Oct 2009, 8:39 pm
by tezza43 Sun 04 Oct 2009, 8:39 pm
Thanks for sharing these pics Sean. It will make my job of preparing the story much easier.
This is going to be one heck of a beautiful model car when finished.

This is going to be one heck of a beautiful model car when finished.

tezza43- AMCC ADDICT
- Number of posts : 4318
Age : 80
Location : Mornington, Victoria
Registration date : 2008-03-21
Re: 1/8th Pocher T50 Bugatti build part 2
![]() by modelmaker Sun 04 Oct 2009, 10:21 pm
by modelmaker Sun 04 Oct 2009, 10:21 pm
Yeah Terry I'm trying to kill two birds with one stone so to speak !tezza43 wrote:Thanks for sharing these pics Sean. It will make my job of preparing the story much easier.
This is going to be one heck of a beautiful model car when finished.
If you notice anything in the photos that you want more info on please let me know wont you.
sean
modelmaker- I should be working on Models
- Number of posts : 119
Age : 55
Location : Mildura Victoria
Registration date : 2008-03-28 -
Re: 1/8th Pocher T50 Bugatti build part 2
![]() by allan Fri 09 Oct 2009, 1:05 pm
by allan Fri 09 Oct 2009, 1:05 pm
 that's looking good so far
allan- AMCC ADDICT
- Number of posts : 10385
Age : 66
Location : East Maitland
Registration date : 2008-03-31
Re: 1/8th Pocher T50 Bugatti build part 2
![]() by sports850 Fri 09 Oct 2009, 2:39 pm
by sports850 Fri 09 Oct 2009, 2:39 pm
The detail (on the kit and your scratch building/super detailing) is amazing . I'm almost afraid to ask but what does the standard kit retail for ?

sports850- Legend Poster
- Number of posts : 1065
Age : 53
Location : Red Rock NSW
Registration date : 2009-08-07
Re: 1/8th Pocher T50 Bugatti build part 2
![]() by modelmaker Fri 09 Oct 2009, 5:06 pm
by modelmaker Fri 09 Oct 2009, 5:06 pm
Don't be afraid to ask Ian if your lucky to find a completely sealed kit I've seen them sell on Ebay for $3000 a started kit can sell for $1200 and a damaged or started kit with missing parts can fetch $900
Sean
Sean
modelmaker- I should be working on Models
- Number of posts : 119
Age : 55
Location : Mildura Victoria
Registration date : 2008-03-28 -
Re: 1/8th Pocher T50 Bugatti build part 2
![]() by sports850 Fri 09 Oct 2009, 5:21 pm
by sports850 Fri 09 Oct 2009, 5:21 pm
Well I can see how they afford to make something with so much detail then , I could easily pay that for a mini kit if it had that sort of detail .
sports850- Legend Poster
- Number of posts : 1065
Age : 53
Location : Red Rock NSW
Registration date : 2009-08-07
Re: 1/8th Pocher T50 Bugatti build part 2
![]() by modelmaker Fri 09 Oct 2009, 5:46 pm
by modelmaker Fri 09 Oct 2009, 5:46 pm
Yeah You and me both mate !!
Sean
Sean
modelmaker- I should be working on Models
- Number of posts : 119
Age : 55
Location : Mildura Victoria
Registration date : 2008-03-28 -
Re: 1/8th Pocher T50 Bugatti build part 2
![]() by dv8v8 Sat 10 Oct 2009, 2:31 am
by dv8v8 Sat 10 Oct 2009, 2:31 am
for that much money i woulda thought u could get a real mini ! 

dv8v8- AMCC ADDICT
- Number of posts : 5648
Location : Rockhampton QLD
Registration date : 2008-04-26
Re: 1/8th Pocher T50 Bugatti build part 2
![]() by sports850 Sat 10 Oct 2009, 6:56 am
by sports850 Sat 10 Oct 2009, 6:56 am
dv8v8 wrote:for that much money i woulda thought u could get a real mini !
Maybe , but the wife wouldn't let me park it in the loungeroom ...
sports850- Legend Poster
- Number of posts : 1065
Age : 53
Location : Red Rock NSW
Registration date : 2009-08-07
Re: 1/8th Pocher T50 Bugatti build part 2
![]() by modelmaker Tue 17 Nov 2009, 3:40 pm
by modelmaker Tue 17 Nov 2009, 3:40 pm
To those few of you who were following this build the model is now packed up and sold incomplete! I got an offer on it I could'nt refuse  sorry and thanks for the interest, Mods Your welcome to Delete the entire thread up to you guys.
Sean
sorry and thanks for the interest, Mods Your welcome to Delete the entire thread up to you guys.Sean
modelmaker- I should be working on Models
- Number of posts : 119
Age : 55
Location : Mildura Victoria
Registration date : 2008-03-28 -
Re: 1/8th Pocher T50 Bugatti build part 2
![]() by tezza43 Wed 18 Nov 2009, 4:03 pm
by tezza43 Wed 18 Nov 2009, 4:03 pm
Thanks for your posts Sean. I was really looking forward to seeing the final build, but I understand your actions. Those kits are rare and when an offer is too good to refuse I would do the same thing.
For those who may not have seen a completed Pocher Bugatti T50 (stock) model here is one to admire.

For those who may not have seen a completed Pocher Bugatti T50 (stock) model here is one to admire.
tezza43- AMCC ADDICT
- Number of posts : 4318
Age : 80
Location : Mornington, Victoria
Registration date : 2008-03-21
Re: 1/8th Pocher T50 Bugatti build part 2
![]() by sports850 Wed 18 Nov 2009, 7:24 pm
by sports850 Wed 18 Nov 2009, 7:24 pm
So , is that a model or a real car ???? Detail is truly amazing .
sports850- Legend Poster
- Number of posts : 1065
Age : 53
Location : Red Rock NSW
Registration date : 2009-08-07
Re: 1/8th Pocher T50 Bugatti build part 2
![]() by tezza43 Wed 18 Nov 2009, 8:06 pm
by tezza43 Wed 18 Nov 2009, 8:06 pm
Yes that is the Pocher model in the pic. At 1:8 scale they do look very real.

tezza43- AMCC ADDICT
- Number of posts : 4318
Age : 80
Location : Mornington, Victoria
Registration date : 2008-03-21
Bugatti brakes
![]() by gravelcords10 Sat 23 Mar 2024, 5:42 am
by gravelcords10 Sat 23 Mar 2024, 5:42 am
Your build journal and photography is excellent; I'm building the 50T Surprofile and I'm getting lots of great info here. But about those brakes. I've substituted .022 stainless steel wire in an attempt to get tight cable with as little lost motion as possible. The cable is flexible and goes around the pulleys fine, but I still can't get the tautness needed because the brake arms move inward when the cable is pulled tight. This rotates the cams, expands the shoes, and doesn't allow any additional movement when the pedal is pressed. I've tried experimenting with some "helper" springs added to hold the brake arms in the outward position so the cams don't rotate, but I didn't like the look and still could not achieve the tautness needed to really make them work.
Does anyone have any solutions they have tried? I took care to get the brake pedal secured on it's shaft, which rotates with no binding, the cams move freely as do the brake shoes, but I suspect the spring holding them isn't as strong as it should be. Ideas?
Does anyone have any solutions they have tried? I took care to get the brake pedal secured on it's shaft, which rotates with no binding, the cams move freely as do the brake shoes, but I suspect the spring holding them isn't as strong as it should be. Ideas?
gravelcords10- AMCC NEWBIE!

- Number of posts : 1
Age : 77
Location : Federal Way, WA
Registration date : 2024-03-23
» 1/8th Pocher T50 Bugatti build
» Pocher Rolls Royce
» 1/8th scale pocher Alfa Monza Mulletto
» Monogram Bugatti T35B
» FranckenJag, total disregard for purist's, I done gone this one MY way, he he he.
» Pocher Rolls Royce
» 1/8th scale pocher Alfa Monza Mulletto
» Monogram Bugatti T35B
» FranckenJag, total disregard for purist's, I done gone this one MY way, he he he.
Page 1 of 1
Permissions in this forum:
You cannot reply to topics in this forum|
|
|