XE Falcon S-Pack ** so anyway 8 years later- **
Page 2 of 36 •  1, 2, 3 ... 19 ... 36
 ![]()
Re: XE Falcon S-Pack ** so anyway 8 years later- **
![]() by sports850 Sun 10 Apr 2011, 6:00 pm
by sports850 Sun 10 Apr 2011, 6:00 pm

sports850- Legend Poster

-
 Number of posts : 1065
Age : 53
Location : Red Rock NSW
Registration date : 2009-08-07
Re: XE Falcon S-Pack ** so anyway 8 years later- **
![]() by harley fan Sun 10 Apr 2011, 7:13 pm
by harley fan Sun 10 Apr 2011, 7:13 pm
 that is some very clever work mate ,you really know your stuff
harley fan- I should be working on Models

- Number of posts : 127
Age : 58
Location : whyalla/south australia
Registration date : 2011-01-17
Re: XE Falcon S-Pack ** so anyway 8 years later- **
![]() by Bear Sun 10 Apr 2011, 11:59 pm
by Bear Sun 10 Apr 2011, 11:59 pm
As a Ford man i love it

Bear- I should be working on Models
- Number of posts : 461
Location : Right here!!
Registration date : 2008-04-01
Re: XE Falcon S-Pack ** so anyway 8 years later- **
![]() by The Goose Mon 11 Apr 2011, 9:21 am
by The Goose Mon 11 Apr 2011, 9:21 am

The Goose- Glue Sniffer

- Number of posts : 78
Age : 38
Location : Melbourne
Registration date : 2009-07-27
Re: XE Falcon S-Pack ** so anyway 8 years later- **
![]() by Bryce Mon 11 Apr 2011, 11:55 am
by Bryce Mon 11 Apr 2011, 11:55 am

Fascinating stuff - keep up the great work!
_________________
Cheers,
Bryce
https://s582.photobucket.com/home/BryceM76
https://www.facebook.com/pages/Michelmore-Rod-Kustom/162990533806679

Bryce- Moderator
- Number of posts : 3329
Location : Melbourne
Registration date : 2008-05-10
Re: XE Falcon S-Pack ** so anyway 8 years later- **
![]() by Alfaholic Mon 11 Apr 2011, 3:30 pm
by Alfaholic Mon 11 Apr 2011, 3:30 pm

Alfaholic- Glue Sniffer
- Number of posts : 83
Age : 53
Location : Sydney
Registration date : 2011-03-19
Re: XE Falcon S-Pack ** so anyway 8 years later- **
![]() by ShawnS Mon 11 Apr 2011, 6:36 pm
by ShawnS Mon 11 Apr 2011, 6:36 pm
tezza43 wrote:Truly I am gobsmacked Shawn. This is wonderful stuff, watching a model being scratch-built this way. This forum thing is great and more people my age should be joining in IMO. I hope you don't mind, but I am collecting your information for a future story in ModelArt Australia (with your permission of course). I reckon there will be many who would be interested to see it's not only military models that are scratch-built. Thanks for your updates - go get 'em mate.
Hi Terry, I don't mind in fact I think you just gave me a reason to finish the thing.
sports850 wrote:That's simply amazing Shawn , what type of glue are you using for this and how long do you have to leave it before you can cut/file/sand/whatever ?
Hi Ian, These are the glues I am using for this project. Two solvent glues and a bottle of CA.

Not through any real personal choice but thats pretty much all my LHS had at the time. When I'm using solvent glue I leave it overnight to dry otherwise the plastic is just too soft to work with. The plastruct glue can be a bit of a cow to work with because it evaporates quickly so you have to act fast.
Alright everyone, the first big problem has arisen. When I was starting to built the rear I thought something wasn't right but I just couldn't put my finger on it. I compared my progress with a picture of the rear of the real car and have discovered that I haven't put enough of a kink on the top half of the car.

You can see on the pic that it's a bit too straight compared to the real thing. So it looks like I may have to rescribe that body line and bend it in a bit more. I will remove the boot at the panel lines and hack off the bonnet (which I'm not happy with anyway) If it doesn't work I'll have to start again for the 4th time.
Fingers crossed it won't come to that.
CheersSS

ShawnS- I Love this place

- Number of posts : 565
Age : 49
Location : South Australia
Registration date : 2009-12-22
Re: XE Falcon S-Pack ** so anyway 8 years later- **
![]() by allan Mon 11 Apr 2011, 6:58 pm
by allan Mon 11 Apr 2011, 6:58 pm
 you get there with in the end there are a lot of Ford fans dribbling on the key boards watching this one,

allan- AMCC ADDICT
- Number of posts : 10385
Age : 66
Location : East Maitland
Registration date : 2008-03-31
Re: XE Falcon S-Pack ** so anyway 8 years later- **
![]() by checkmate Mon 11 Apr 2011, 8:27 pm
by checkmate Mon 11 Apr 2011, 8:27 pm
Gees Tezza thats a big call mate considering the company your in on this forum.tezza43 wrote:I reckon there will be many who would be interested to see it's not only military models that are scratch-built.
_________________

checkmate- Moderator
- Number of posts : 2573
Age : 49
Location : Tumut NSW.
Registration date : 2008-04-16 -

Re: XE Falcon S-Pack ** so anyway 8 years later- **
![]() by spiritman Tue 12 Apr 2011, 1:42 pm
by spiritman Tue 12 Apr 2011, 1:42 pm
 Oh, please, please, do mould it in resin when it's finished
spiritman- I should be working on Models
- Number of posts : 161
Age : 56
Location : Melbourne
Registration date : 2008-03-28
Re: XE Falcon S-Pack ** so anyway 8 years later- **
![]() by Clutch Tue 12 Apr 2011, 2:22 pm
by Clutch Tue 12 Apr 2011, 2:22 pm


I'll just pull up a seat, with the rest of AMCC and watch you do your thing.

Clutch- Legend Poster
- Number of posts : 1310
Age : 48
Location : Bargara Qld
Registration date : 2009-04-21
Re: XE Falcon S-Pack ** so anyway 8 years later- **
![]() by sports850 Tue 12 Apr 2011, 6:21 pm
by sports850 Tue 12 Apr 2011, 6:21 pm
sports850- Legend Poster
- Number of posts : 1065
Age : 53
Location : Red Rock NSW
Registration date : 2009-08-07
Re: XE Falcon S-Pack ** so anyway 8 years later- **
![]() by dv8v8 Tue 12 Apr 2011, 9:04 pm
by dv8v8 Tue 12 Apr 2011, 9:04 pm

dv8v8- AMCC ADDICT
- Number of posts : 5648
Location : Rockhampton QLD
Registration date : 2008-04-26
Re: XE Falcon S-Pack ** so anyway 8 years later- **
![]() by Bear Wed 13 Apr 2011, 12:26 am
by Bear Wed 13 Apr 2011, 12:26 am
 They were nowhere near the angle in the brochure, much closer to what you've done, i think.
Bear- I should be working on Models
- Number of posts : 461
Location : Right here!!
Registration date : 2008-04-01
Re: XE Falcon S-Pack ** so anyway 8 years later- **
![]() by spiritman Wed 13 Apr 2011, 2:05 pm
by spiritman Wed 13 Apr 2011, 2:05 pm
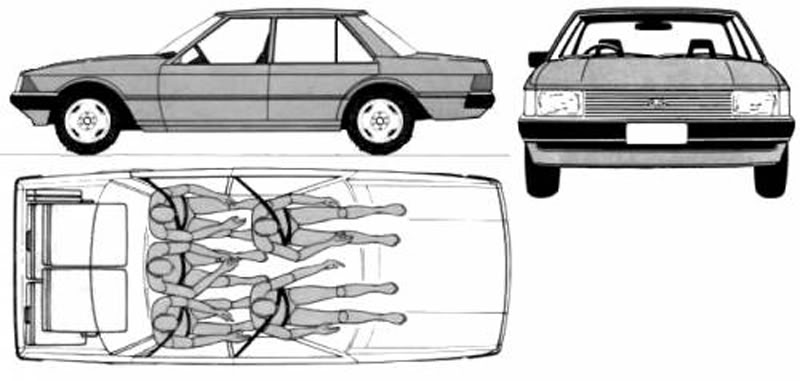
Compare the shot on the left page to the car on the right,
 the same car showing two completely different angles?
Don't alter anything until your sure, it looks to good to stuff up now.

spiritman- I should be working on Models
- Number of posts : 161
Age : 56
Location : Melbourne
Registration date : 2008-03-28
Re: XE Falcon S-Pack ** so anyway 8 years later- **
![]() by ShawnS Wed 13 Apr 2011, 8:14 pm
by ShawnS Wed 13 Apr 2011, 8:14 pm

I have modified the picture to give you an idea what I'm talking about. Look at the boot panel gap line, you can see on the model that the angle on the outside of the model is just too straight compared to the triangular look of the real car. The pics in the brochure are actually pretty good and it's just the angle of my photo and the red car on the red background that seems to distort it.
I would have let it go if there were no other reasons to rework it but there were a couple of other things that bothered me such as my really dodgy scribing on the door panel lines and the way I attached the bonnet to the front panels which was going to lead to way too much work to get it right. I am slightly annoyed about starting again but I will not let it bother me the slightest bit. I'll post pics soon of the redo.
Don't worry guys, I'm with this one till it's done. I don't give up that easy.
CheersSS
ShawnS- I Love this place
- Number of posts : 565
Age : 49
Location : South Australia
Registration date : 2009-12-22
Re: XE Falcon S-Pack ** so anyway 8 years later- **
![]() by slowlylearning Wed 13 Apr 2011, 9:06 pm
by slowlylearning Wed 13 Apr 2011, 9:06 pm
slowlylearning- AMCC ADDICT
- Number of posts : 1533
Age : 33
Location : Bris
Registration date : 2008-09-28
Re: XE Falcon S-Pack ** so anyway 8 years later- **
![]() by truges Thu 14 Apr 2011, 12:59 pm
by truges Thu 14 Apr 2011, 12:59 pm
truges- I should be working on Models
- Number of posts : 237
Age : 55
Location : Woy Woy
Registration date : 2009-04-29
Re: XE Falcon S-Pack ** so anyway 8 years later- **
![]() by ShawnS Thu 14 Apr 2011, 8:47 pm
by ShawnS Thu 14 Apr 2011, 8:47 pm

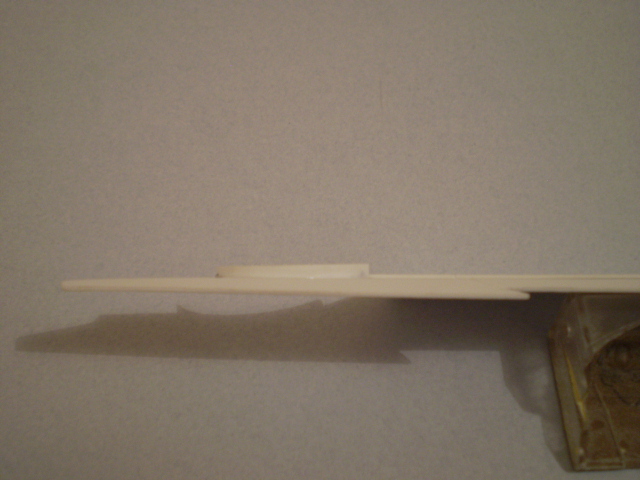
You can see that the top section is bent inwards but straight, the centre section is flat and the bottom section is curved in to get the basis for the body shape.


With this version I have added a thicker spine onto the inside to help keep it straight.


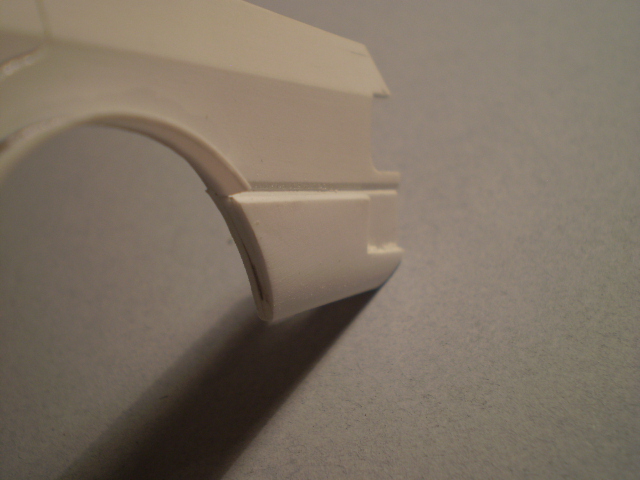
The front 1/4 panels are bent inwards. Before.
After.

I have also slightly bent in the rear 1/4's as well. The thick spine is bent to match the shape of the panels before glueing with CA. That means there is no chance of the panels straightening themselves over time.
I am starting to add layers to the inside to help thicken it for the casting later.

Looking better so far. Better angles, better scribe lines cleaner all around.

Here is the hall of fame. I suppose you could call them the "proof of concepts".

The top was the last version.
The middle two were the first serious ones. I abandoned those for a few reasons. They weren't even close to identical, one side warped and flexed and they were way too messy. In the end they were going to be too much work to get right.
The bottom one was the test run that got me thinking out loud about how I would go about it.
More updates soon,
CheersSS
ShawnS- I Love this place
- Number of posts : 565
Age : 49
Location : South Australia
Registration date : 2009-12-22
Re: XE Falcon S-Pack ** so anyway 8 years later- **
![]() by slowlylearning Thu 14 Apr 2011, 9:42 pm
by slowlylearning Thu 14 Apr 2011, 9:42 pm
slowlylearning- AMCC ADDICT
- Number of posts : 1533
Age : 33
Location : Bris
Registration date : 2008-09-28
Re: XE Falcon S-Pack ** so anyway 8 years later- **
![]() by Bear Fri 15 Apr 2011, 12:39 am
by Bear Fri 15 Apr 2011, 12:39 am
Bear- I should be working on Models
- Number of posts : 461
Location : Right here!!
Registration date : 2008-04-01
Re: XE Falcon S-Pack ** so anyway 8 years later- **
![]() by allan Fri 15 Apr 2011, 8:41 am
by allan Fri 15 Apr 2011, 8:41 am
allan- AMCC ADDICT
- Number of posts : 10385
Age : 66
Location : East Maitland
Registration date : 2008-03-31
Re: XE Falcon S-Pack ** so anyway 8 years later- **
![]() by ShawnS Fri 15 Apr 2011, 4:38 pm
by ShawnS Fri 15 Apr 2011, 4:38 pm
Bear wrote:Lookin good but please get more reference pics, cause i still recon that pic has been retouched and the boot is squarer. Sorry but it just dont look right, wish i had some pics to help out. Only going from memory, which is suss at the best of times, just ask the missus, whatshername.
I'm fully sorted for reference pics Bear, I've got it covered from every angle and more. Trust me, it just wasn't right.
Ok, I had a half work day today so that allowed me to get some more bench time.
Started the door handles by marking out where they were to go.

Scribed them out.

I used a blade to gently scrape out the recesses.


After all of the block sanding has been done I'll add strips of evergreen for the tops of the door handles.
I have also sanded a more rounded contour onto the bottom of the sides of the body and rear panel.

and I ground out the inside of the wheel arches with the dremel.
Before.

After.

Still a bit of work to do before I reach the same stage as the previous version but it's a lot better than any version before it.
Thanks for looking.
More updates soon.
CheersSS
ShawnS- I Love this place
- Number of posts : 565
Age : 49
Location : South Australia
Registration date : 2009-12-22
Re: XE Falcon S-Pack ** so anyway 8 years later- **
![]() by Kane Fri 15 Apr 2011, 10:23 pm
by Kane Fri 15 Apr 2011, 10:23 pm

Kane- AMCC ADDICT
- Number of posts : 1505
Age : 47
Location : Rainsville (Sydney)...
Registration date : 2009-01-12
Re: XE Falcon S-Pack ** so anyway 8 years later- **
![]() by tezza43 Sat 16 Apr 2011, 10:27 am
by tezza43 Sat 16 Apr 2011, 10:27 am
Kane wrote:Your mad mate, but great work nonetheless.
I have to agree with my esteemed colleague, and my curiosity and fascination with this build is at a high, so keep the posts coming mate.

Tezza

tezza43- AMCC ADDICT
- Number of posts : 4318
Age : 80
Location : Mornington, Victoria
Registration date : 2008-03-21
Page 2 of 36 • 1, 2, 3 ... 19 ... 36 ![]()
» New Years Resolution.
» First build for over 30 years- 65 Chev P/up DONE!
» 1st one in 14 years
» Muscle Cars!
|
|
|